How a Light Curtain Works: Safety Light Curtains Explained
Safety light curtains explained — how the transmitter/receiver beams detect intrusion, resolution and safety distance, muting and blanking, and PLC/safety wiring.
A safety light curtain is an electro-sensitive protective device (ESPD) that creates an invisible infrared detection zone across a hazardous machine opening.
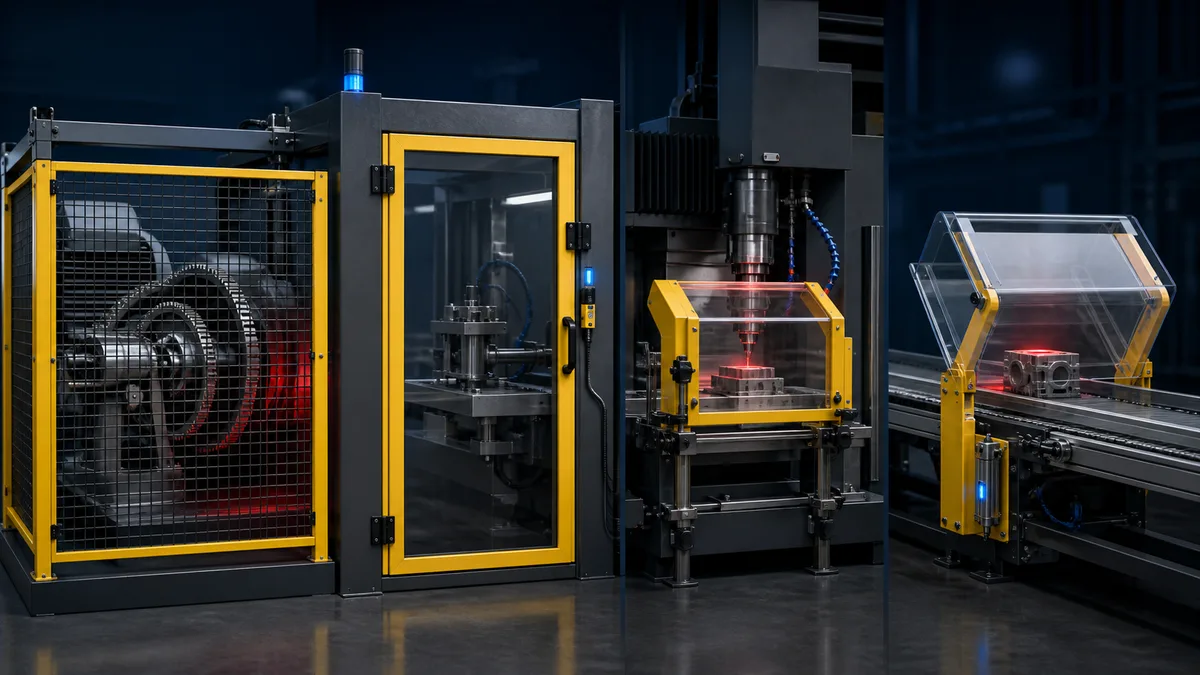
Light curtains are among the most common safeguarding devices in industrial automation. You will find them guarding press brakes, injection moulding machines, assembly robots, palletisers, and conveyor in-feed points. Understanding how they work — and, critically, how to wire and integrate them correctly — is a core competency for any controls engineer working in machine safety.
Safety Light Curtain Definition
A safety light curtain belongs to the broader family of optoelectronic safety devices covered by IEC 61496 (Safety of Machinery — Electro-Sensitive Protective Equipment). It consists of two separate housings mounted opposite each other across the hazardous opening:
- Transmitter (TX): contains an array of infrared LEDs that emit modulated light beams.
- Receiver (RX): contains a matching array of photodetectors, one aligned with each transmitter LED.
Together, the TX and RX create a planar "curtain" of parallel beams. The active sensing height is the total span covered by those beams; the active width is determined by how far apart the two housings are installed.
Because this is a safety device, it must satisfy the fault-detection and reliability requirements of IEC 61496, IEC 62061, or ISO 13849-1 at an appropriate Performance Level (PL) or SIL. A standard photoelectric sensor does not meet those requirements and must never be used as the primary safeguard for a hazardous machine motion.
How a Safety Light Curtain Works
Transmitter, Receiver, and Synchronized Beams
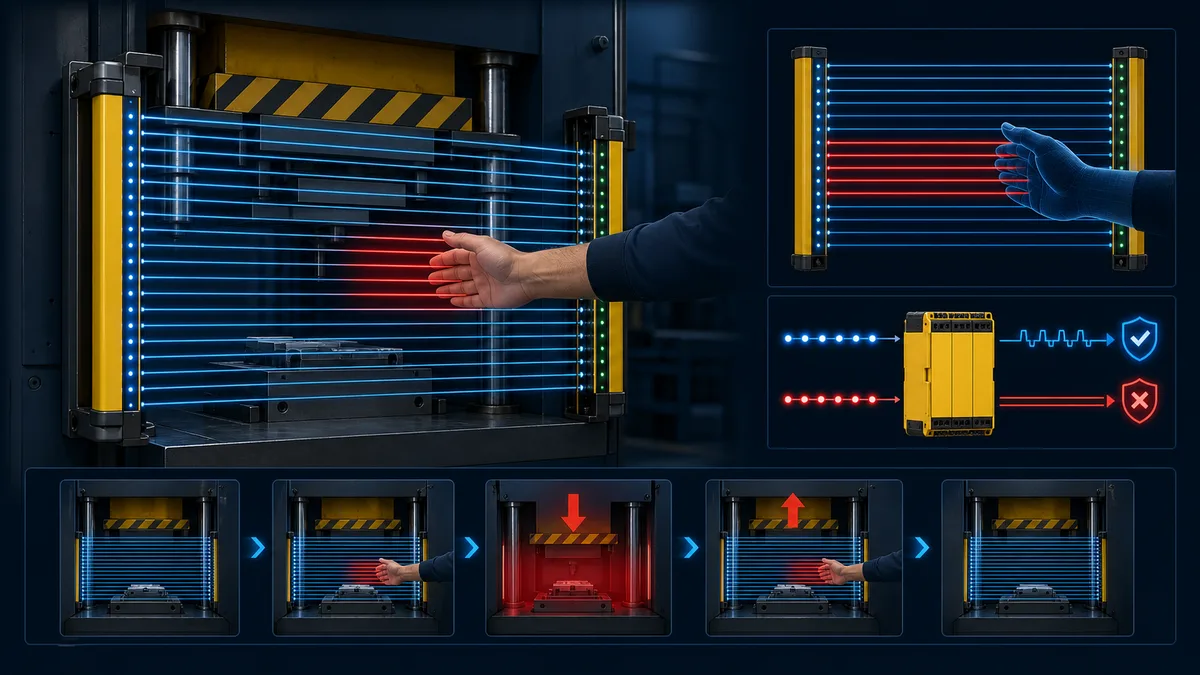
The transmitter does not fire all its LEDs simultaneously. Instead, it activates each LED in a rapid, timed sequence — typically cycling through the full array many times per second. This sequential scanning approach has two important benefits:
- It eliminates cross-talk between adjacent beams, because only one beam is active at any instant.
- It allows the receiver to correlate each detected pulse with the expected LED position, making the system immune to external ambient light and certain failure modes.
The modulation frequency is proprietary to each manufacturer, but the principle is universal. The receiver evaluates each pulse: if all expected pulses arrive within tolerance, the curtain is "clear." If any pulse is missing — because the corresponding beam has been interrupted — the curtain switches to the "tripped" state.
OSSD Outputs
The curtain's safety state is communicated to the rest of the safety circuit through OSSD outputs (Output Signal Switching Device). A properly functioning light curtain provides two independent, redundant OSSD channels:
- OSSD1 and OSSD2 are both solid +24 V DC when the curtain is clear (no intrusion detected).
- Both switch simultaneously to 0 V when the curtain trips (beam interrupted, fault detected, or power lost).
- Each OSSD periodically pulses low for a short test interval (typically a few hundred microseconds). This self-test pulse proves the output circuit is alive and capable of switching. A safety relay or safety controller monitors these test pulses as proof of device health.
The two-channel redundancy is fundamental. A single stuck-at-high fault on one output does not prevent the safety function from being executed, because the second output still transitions correctly.
Resolution and Detection Capability
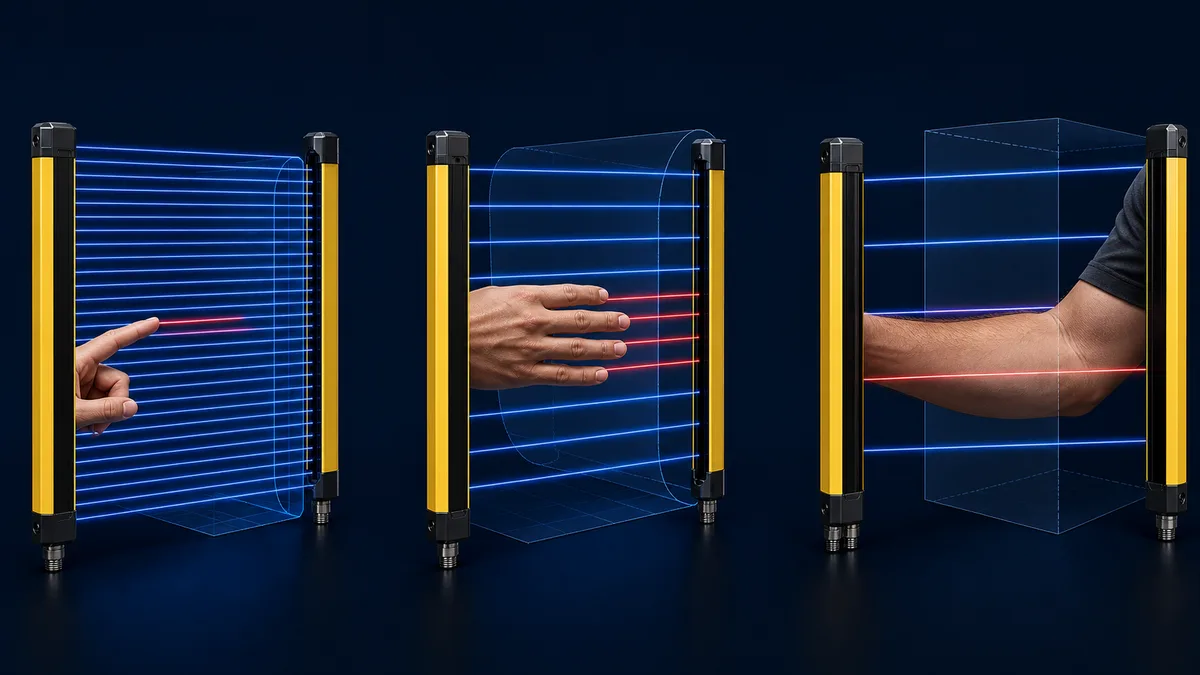
Resolution is the minimum object diameter that the light curtain is guaranteed to detect. It is determined by the beam pitch (centre-to-centre spacing between adjacent beams) and the optical aperture of the lenses.
The standard formula used by IEC 61496 for calculating minimum detectable object size is:
Minimum object size = beam pitch + effective aperture constant
In practice, manufacturers specify a defined resolution (d) value directly:
| Resolution | Typical Application |
|---|---|
| 14 mm | Finger detection (down to finger-tip entry) |
| 20–25 mm | Hand detection |
| 30–40 mm | Wrist / hand detection |
| 55–90 mm | Arm / body detection |
| 90+ mm | Whole-body presence detection |
Finger-detection curtains (14 mm resolution) are used where the hazard point is reachable by a single finger — for example, the tooling area of a small press. Hand-detection and body-detection curtains are used where the geometry of the guarded opening makes finger access physically impossible.
Choosing too coarse a resolution for the hazard is a safety design error; always follow ISO 13857 for minimum distances and the risk assessment outcome for the required body-part resolution.
Safety Distance Calculation
Installing a light curtain at the correct distance from the hazard is mandatory — and it is an engineering calculation, not an installation preference. Positioning the curtain too close to the hazard means the machine may not stop before the detected hand or finger reaches the danger zone.
The Formula (ISO 13855)
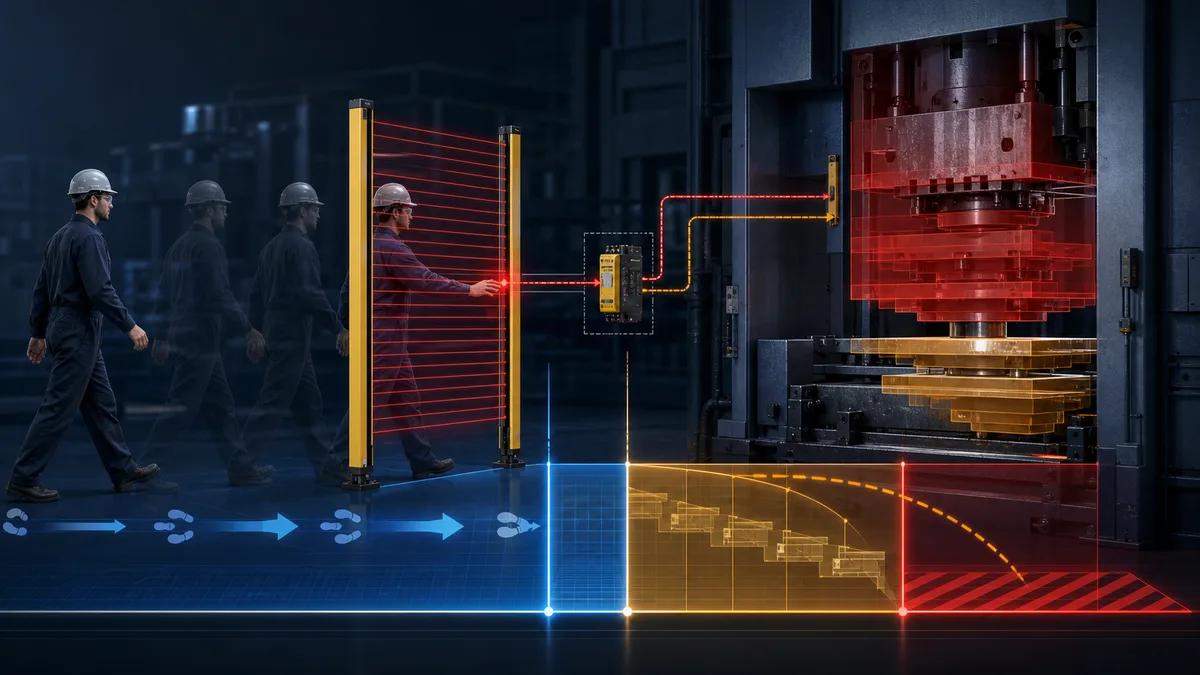
The familiar conceptual form of the separation-distance calculation is:
S = K × (t_s + t_r)
Where:
- K = the approach-speed parameter for the selected approach case (mm/s). Use the value and case rules in the currently adopted edition of ISO 13855 rather than copying a value from an example.
- t_s = stopping time of the machine (measured from when the stop signal is issued to when all hazardous motion ceases), in seconds.
- t_r = response time of the light curtain (specified by the manufacturer), in seconds.
Additional Correction for Finger-Detection Curtains
Some perpendicular-approach cases include an additional reach or intrusion term C related to detection capability. The formula below is a legacy worked-example pattern, not a substitute for selecting the correct case from the current standard:
C = 8 × (d − 14) (in mm, where d is in mm)
The full formula becomes:
S = K × (t_s + t_r) + C
Worked Example
- Machine stopping time (t_s): 0.18 s
- Light curtain response time (t_r): 0.008 s (8 ms — typical for a finger-detection curtain)
- Approach speed (K): 2,000 mm/s
- Resolution (d): 14 mm → C = 8 × (14 − 14) = 0 mm
S = 2,000 × (0.18 + 0.008) + 0 = 376 mm minimum
The arithmetic gives 376 mm for those stated example inputs. A real design must apply the current standard's case rules, minimums, geometry and installation tolerance; do not turn this illustrative result into a default distance.
Never measure stopping time once and assume it is constant. Mechanical wear, load variation, and brake degradation all affect stopping time. The distance calculation must be based on the worst-case (longest) measured stopping time, and stopping time should be monitored periodically over the machine's life.
Type 2 vs Type 4 (IEC 61496)
IEC 61496 defines performance types for ESPDs. For light curtains, Type 2 and Type 4 are the most common:
| Feature | Type 2 | Type 4 |
|---|---|---|
| Device-level diagnostic concept | Periodic test architecture | Higher fault-detection and fault-tolerance requirements |
| Type classification | Verified from the device certificate and manual | Verified from the device certificate and manual |
| System performance ceiling | Limited by the current application standard and certified device data | Higher ceiling may be supported by certified device data |
| Complete safety-function result | Depends on sensor, logic, output, diagnostics, wiring and mechanics | Depends on sensor, logic, output, diagnostics, wiring and mechanics |
| Selection basis | Required PL/SIL, environment, application and adopted standards | Required PL/SIL, environment, application and adopted standards |
Type 4 is common where a higher device-level capability is required, but it is not an automatic default or a complete-system rating. Type 2 may be suitable where the risk assessment, current application standard and certified documentation support it. Record the selection basis rather than choosing by convention.
Verify the device type on the manufacturer's datasheet and confirm it matches the required PL/SIL from your functional safety assessment. Mismatching a Type 2 curtain to a PL d or PL e requirement is a common and dangerous specification error.
For background on how PL and SIL are determined from a risk assessment, see the linked guides.
Muting and Blanking Explained
Muting
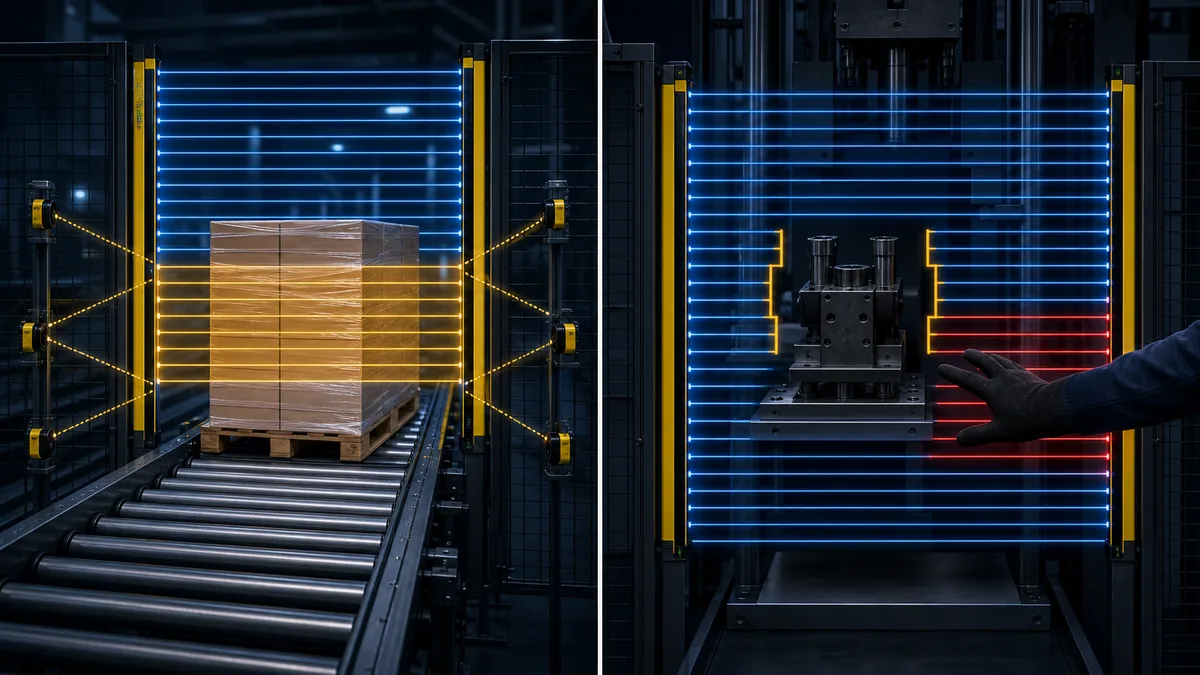
Muting is the intentional, temporary, and automatic suspension of the light curtain's safeguarding function to allow material — not personnel — to pass through the detection zone without triggering a machine stop.
The classic use case is a conveyor feeding a palletiser or packaging machine. The pallet or product load must pass through the curtain opening on every cycle. Without muting, the curtain would trip every time a product entered the cell. With muting, the safety function is automatically suspended for the duration of material passage and then automatically restored.
Muting is a safety function in its own right and must be implemented correctly:
- Muting is initiated by two independent muting sensors (typically photoelectric sensors or position switches), not by a PLC output alone. Using a single sensor or a PLC-commanded signal to enable muting is a design fault — the independence of the two muting signals provides the required redundancy.
- The two muting sensors must be arranged so that a person cannot generate the muting condition by manipulating them (for example, by blocking both sensors simultaneously with a single action or body part). The geometry of the sensor arrangement — their spacing and position relative to the curtain and the product flow — is critical.
- Muting must be time-limited in most implementations. Indefinite muting with no watchdog is a recognised hazard.
- A muting lamp (a clearly visible indicator) must be active during the muting period so operators and bystanders can see that the safeguard is suspended.
- The muting function logic is typically implemented in the safety relay or safety controller, not in the standard PLC.
Common Muting Sensor Arrangements
Two arrangements are widely used:
T-type (sequential) muting: Two sensors are placed in series along the material flow, before the curtain. The product triggers sensor 1 first, then sensor 2. Both must be active simultaneously (within a maximum time window) to initiate muting. The curtain muting window closes when the product clears the curtain's field.
L-type (parallel/cross) muting: Two sensors are arranged perpendicular to the material flow so the product activates both simultaneously. This arrangement is often used where the product enters the curtain field at low speed or in a specific orientation.
Both arrangements require careful dimensional design to prevent personnel from defeating the muting condition.
Blanking
Blanking (also called beam suppression) is different from muting. Rather than suspending the entire curtain, blanking permanently or semi-permanently disables one or more specific beams within the active field — usually to accommodate a fixture, tool holder, or part of a machine structure that passes through the detection zone permanently.
- Fixed blanking: A specific beam (or contiguous set of beams) is disabled during configuration. The curtain will not trip if that beam is blocked, but will trip if any other beam is blocked.
- Floating blanking: One or more beams can be blocked anywhere in the field without tripping, as long as the object does not exceed a defined size. Used for slow-moving tooling or workpieces that traverse the field.
Blanking reduces the effective resolution and detection capability of the curtain. Always verify that the blanked zone cannot be used as an access route by a person and that the remaining active field still provides adequate protection.
Wiring to a Safety Relay or Safety PLC
This is where many controls engineers — especially those new to machine safety — make critical mistakes.
Why You Cannot Wire a Light Curtain to a Standard PLC Input for the Safety Function
A standard PLC digital input is a Category 1 or at best Category 2 device with no internal redundancy, no cross-channel monitoring, and no proof-test capability at the speed required by IEC 62061 or ISO 13849. A standard PLC output used to stop a machine via a contactor has a single point of failure — a welded contact, a firmware fault, or a watchdog failure can leave the machine running even when the PLC program commands a stop.
The light curtain's OSSD outputs are designed to connect to a safety relay or safety controller input circuit. These devices:
- Monitor both OSSD channels simultaneously and independently.
- Detect discrepancies between OSSD1 and OSSD2 (which indicate a wiring fault or device fault).
- Monitor the OSSD self-test pulses to confirm the curtain is functioning.
- Control the safety output contacts (which switch the motor contactor or drive enable) through redundant, force-guided relay contacts or solid-state outputs — and monitor those contacts for welding or failure.
For a deeper discussion on why the architecture matters, see Safety PLC vs Standard PLC.
Typical Wiring Architecture
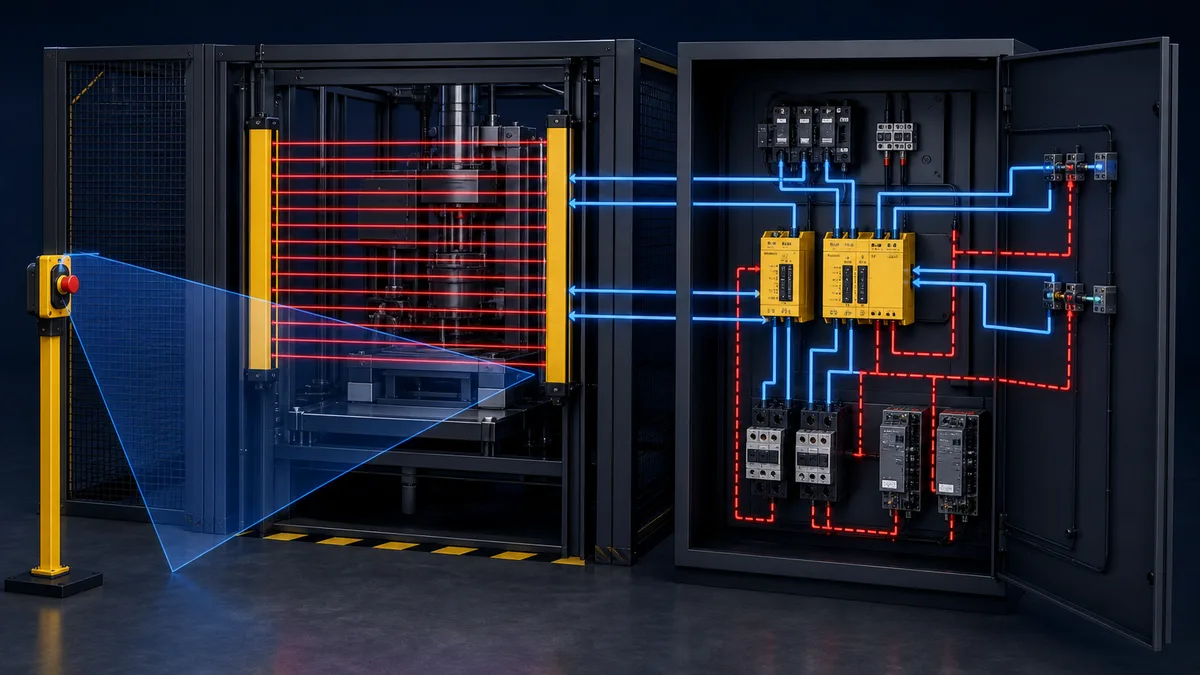
24 V DC Supply (safety-rated)
        |
  [Light Curtain TX]   [Light Curtain RX]
                              |
                        OSSD1 ──┐
                        OSSD2 ──┤──► Safety Relay (or Safety Controller)
                        0 V ────┘        |
                                   Force-guided contacts
                                         |
                               Motor Contactor / Drive Enable
                                         |
                                  Standard PLC (monitoring only)
                                  (stop confirmation, HMI feedback)
Key wiring rules:
- OSSD cable routing must follow the installed manuals and safety design. Segregation, cable type, fault exclusions and diagnostic test pulses are product- and architecture-specific; the design must address a short to a non-safety supply without inventing a universal conduit rule.
- Cable shielding: Follow the manufacturer's guidance. Excessive cable capacitance can affect the OSSD test pulse timing and cause nuisance trips or — worse — missed fault detection.
- Feedback loop (EDM — External Device Monitoring): Most safety relays require the normally-closed auxiliary contacts of the downstream contactors to be wired back into the safety relay's EDM input. This confirms that the contactors actually opened when commanded. Without EDM, a welded contactor contact goes undetected.
- Manual reset: After a curtain trip and machine stop, most safety circuits require a manual reset — a deliberate operator action (pressing a reset button outside the guarded zone) before the safety relay re-enables the machine. This prevents automatic restart, which is a separate and serious hazard.
- Muting inputs: If muting is used, the two muting sensor signals are wired to dedicated inputs on the safety relay or safety controller — not to the standard PLC.
Integration with a Safety PLC (Safety Controller)
When a safety relay is replaced by a safety PLC (such as a Siemens S7-1500F, Allen-Bradley GuardLogix, or Pilz PSS 4000), the OSSD inputs connect to dedicated safety-rated digital input modules. The safety program:
- Evaluates both OSSD channels.
- Implements the muting logic (sensor arrangement, time limits, muting lamp output).
- Drives the safety-rated output module to remove power from the hazardous actuator.
- Provides diagnostic data back to the standard control PLC via standard I/O or a fieldbus.
The safety program is written in a certified safety programming environment (IEC 61131-3 compliant, with SIL/PL certification for the CPU and I/O modules) and undergoes a separate validation process from the standard machine program. For a broader view of how this fits into your safety architecture, refer to the machine guarding overview.
Commissioning and fault evidence
Commissioning should prove alignment, the complete protective height, every intended approach path, response and stopping time, both OSSD channels, final-element monitoring, reset visibility, restart prevention, muting/blanking limits and the behavior after supply loss. Troubleshoot intermittent trips from evidence: inspect contamination, alignment, mounting vibration, reflective surfaces, cable/supply state and time-stamped channel diagnostics before changing a parameter.
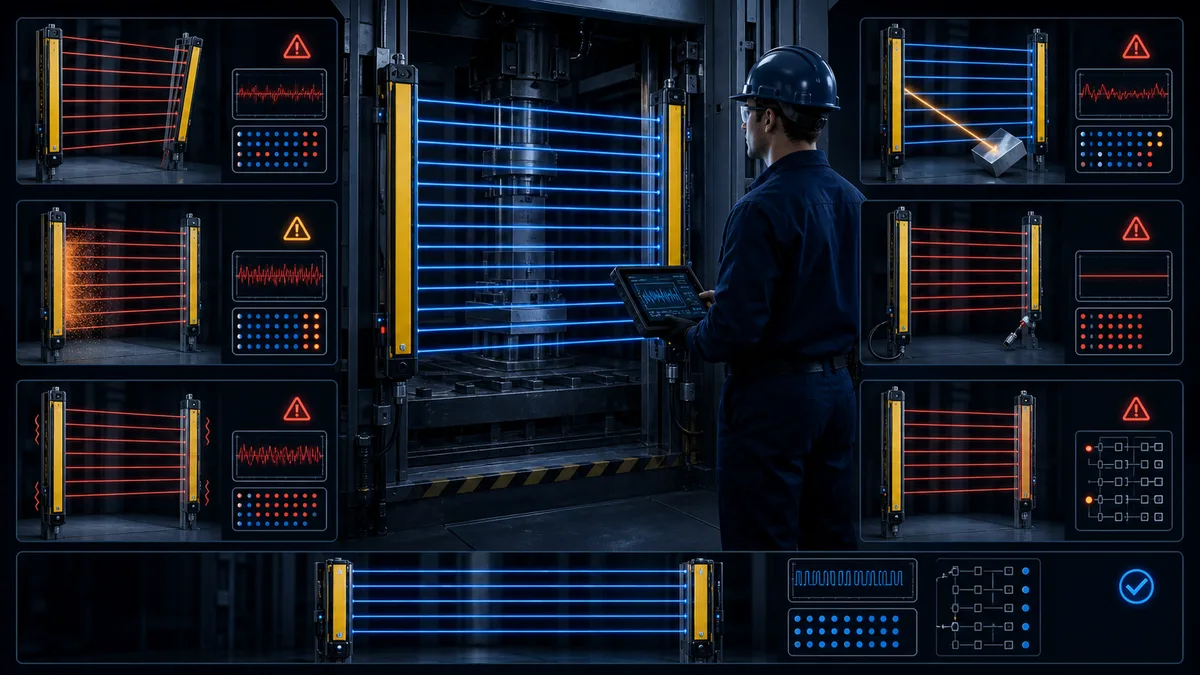
Muting, blanking and normal-operation matrix
| Mode or feature | Intended purpose | Principal risk if misapplied | Evidence to retain |
|---|---|---|---|
| Normal protective field | Detect a person or body part entering the field | Reach-around, inadequate resolution or stopping too slowly | Field geometry, detection capability, response and stopping-time results |
| Muting | Temporarily allow a defined material flow under validated conditions | A person can reproduce the mute condition or the mute persists too long | Sensor geometry, sequence/timing, indicator, timeout and intrusion tests |
| Fixed blanking | Tolerate a defined stationary obstruction | The opening or reduced detection capability becomes an access route | Blanked beams, mechanical constraint, recalculated distance and test-piece results |
| Floating blanking | Tolerate a bounded moving obstruction | A larger object or body part passes without detection | Allowed size/count, effective resolution, configuration lock and functional tests |
| Restart interlock/reset | Require a deliberate action after field clearing | Reset becomes start, or a hidden person remains inside | Reset location/sightline, separate start logic and presence-inside-zone review |
Light curtain versus physical guard
| Decision factor | Light curtain can be suitable when… | Prefer or retain a physical guard when… |
|---|---|---|
| Stopping behavior | The verified complete response stops the hazard before it can be reached | Motion or stored energy persists beyond the permissible access time |
| Containment | There is no relevant ejecta, hot material, radiation, fluid or process emission to contain | The safeguard must physically contain or shield the hazard |
| Access frequency | Frequent unobstructed access is genuinely required | Access is rare and a fixed barrier removes reliance on control behavior |
| Approach geometry | Every route around, over, under and through can be controlled and tested | The field leaves practical bypass or undetected presence routes |
| Process variation | Tooling, loads and modes stay inside a validated configuration envelope | Frequent changes make field, response or distance assumptions unstable |
Troubleshooting evidence matrix
| Symptom | Evidence branch | Safe next check | Avoid |
|---|---|---|---|
| Both OSSDs turn off together | Valid obstruction, alignment, contamination or device state | Preserve diagnostics; inspect the complete field and status indicators | Repeated reset before identifying the trigger |
| One channel differs | Cable, connector, receiver or input-channel discrepancy | Compare time-stamped OSSD/input states and inspect to the manuals | Bridging channels or masking discrepancy logic |
| Trips with vibration | Mounting movement, marginal alignment or cable intermittency | Observe alignment margin and mechanical movement under the same operating condition | Increasing tolerance without proving the cause |
| Trips near reflective surfaces | Optical reflection or bypass path | Apply the manufacturer's reflective-surface rules and repeat test-piece checks | Assuming visible alignment proves safe detection |
| Reset unavailable | Field blocked, EDM open, channel fault or reset sequence invalid | Read device, safety logic and final-element states in order | Forcing an output or bypassing feedback |
| Stops correctly but restarts unexpectedly | Retained run command or reset/start coupling | Verify restart interlock and separate deliberate start behavior | Treating field clear as authorization to run |
Commissioning and proof-test matrix
| Test | Expected result | Record |
|---|---|---|
| Move the specified test piece through the complete protective height and relevant approach paths | OSSDs and the safety function respond at every required position | Test piece, path, field status and safe-state result |
| Interrupt and restore the field in every operating mode | Correct stop occurs; field clearing alone does not create an unexpected start | Mode, command state, reset/start sequence and result |
| Measure total stopping performance under representative load and temperature | Worst credible result remains inside the validated separation-distance basis | Instrument, individual readings, conditions and selected worst case |
| Exercise each OSSD/input channel with an approved test method | Channel faults are detected and unsafe reset/restart is blocked | Fault, diagnostic code, output/final-element state and recovery |
| Test muting and blanking boundaries | Only specified objects, sequences, sizes and time windows are tolerated | Configuration revision, positive/negative cases and observed timing |
| Simulate supply loss and final-element feedback faults | Recovery follows the safety requirement; welded or failed outputs prevent re-enable | Initial state, fault, safe state, power recovery and reset result |
Frequently Asked Questions
How does a safety light curtain work?
A safety light curtain uses a transmitter housing containing an array of infrared LEDs and a receiver housing containing matching photodetectors. The transmitter fires each LED in a rapid sequence; the receiver checks that each corresponding pulse arrives. If any beam is blocked by an intrusion, the receiver does not detect that pulse, and the curtain's two OSSD outputs immediately switch from +24 V to 0 V. A safety relay or safety controller monitors both OSSD outputs and opens its force-guided contacts to remove power from the hazardous machine actuator.
What is muting on a light curtain?
Muting is the temporary, automatic suspension of the light curtain's protective function to allow material (a pallet, a product, a fixture) to pass through the detection zone without causing a machine stop. It is initiated by two independent muting sensors arranged so that personnel cannot falsely trigger the muting condition. A visible muting lamp must illuminate during any muted interval. Muting is a safety function and must be implemented in a safety relay or safety controller, not in a standard PLC.
What is the difference between Type 2 and Type 4 light curtains?
Type 4 and Type 2 are device types defined by IEC 61496 with different fault-behavior and performance requirements. A Type 4 device can be used in architectures up to the performance stated by its certified documentation; a Type 2 device supports a lower ceiling. The achieved PL or SIL still depends on the complete input, logic, output, diagnostics and machine response. Select the type from the risk assessment and applicable product/manual evidence rather than treating Type 4 as an automatic system rating.
How do you calculate safety distance for a light curtain?
Start with the applicable approach case in the current adopted edition of ISO 13855. The conceptual relationship is S = K × T + C: an approach-speed parameter multiplied by total system response time, plus the case-specific intrusion/reach term. Use measured worst-case machine stopping performance, all sensor/logic/output response times, actual geometry and the installed device manual. The values in this article are an illustration, not a reusable design distance.
Can you connect a light curtain directly to a standard PLC input?
You can connect a light curtain OSSD output to a standard PLC input for monitoring and diagnostic purposes, but you must never rely on a standard PLC input/output path as the safety function that stops the machine. The safety function must run through a certified safety relay or safety controller with redundant, monitored output contacts. A standard PLC has no internal fault detection, cross-channel monitoring, or output contact monitoring at the level required by IEC 62061 or ISO 13849.
What is blanking on a safety light curtain?
Blanking configures the protective field to tolerate particular interrupted beams or a defined moving object. Because it changes the effective detection capability, the configuration, remaining protection, mechanical constraints and safety distance must be evaluated and validated. It is not a general-purpose bypass for nuisance trips.
Why does a light curtain trip intermittently?
Common evidence branches include contamination on the optics, marginal alignment, mounting vibration, reflective surfaces, unstable supply, cable faults, incompatible test pulses or one OSSD channel changing differently from the other. Preserve time-stamped diagnostics and inspect the installation before clearing faults or changing configuration.
Can a safety light curtain replace a physical guard?
Only where the risk assessment shows presence sensing is suitable. A light curtain cannot contain ejected material, block heat or prevent someone from reaching around, over or under an inadequately designed field. Physical barriers may still be required around other access paths and hazards.
Does resetting a light curtain restart the machine?
Reset and machine start should be distinct decisions where the risk assessment requires it. Clearing the field or resetting the safety function must not cause an unexpected hazardous restart from a retained run command. Reset location, visibility and presence inside the protected zone also need review.
How should a light curtain be tested?
Validate the full protective height and all approach paths with the specified test piece, both OSSD channels, response and stopping time, reset/restart behavior, final-element feedback, muting/blanking cases, supply loss and representative faults. Record the configuration, expected result, observed result and measured values.
Primary sources and limitations
This is an educational guide, not a light-curtain selection, separation-distance calculation, wiring drawing or validation record for a specific machine. The July 2026 second edition of IEC 62046 replaced the 2018 edition. Verify the edition adopted in the project jurisdiction, then use the complete standards and the exact transmitter, receiver, controller and final-element manuals with a competent machinery-safety professional.
- IEC 61496-1:2020 — General requirements and tests for ESPE
- IEC 61496-2:2020 — Requirements for AOPDs
- IEC 62046:2026 — Application of protective equipment to detect persons
- ISO 13855:2024 — Positioning safeguards
- ISO 13849-1:2023 — Safety-related parts of control systems
- IEC 62061:2021 — Functional safety of machinery control systems
- IEC 60204-1:2016+A1:2021 — Electrical equipment of machines
- OSHA Machine Guarding eTool — Devices
- SICK deTec4 safety light curtain operating instructions
- Banner S4B Type 4 safety light curtain product and documentation page
- ISO 12100:2010 — Risk assessment and risk reduction