PROFINET Tutorial: Configure, Test & Diagnose
Configure a PROFINET IO device in TIA Portal, verify names and cyclic data, diagnose faults, and test recovery with an evidence-based checklist.
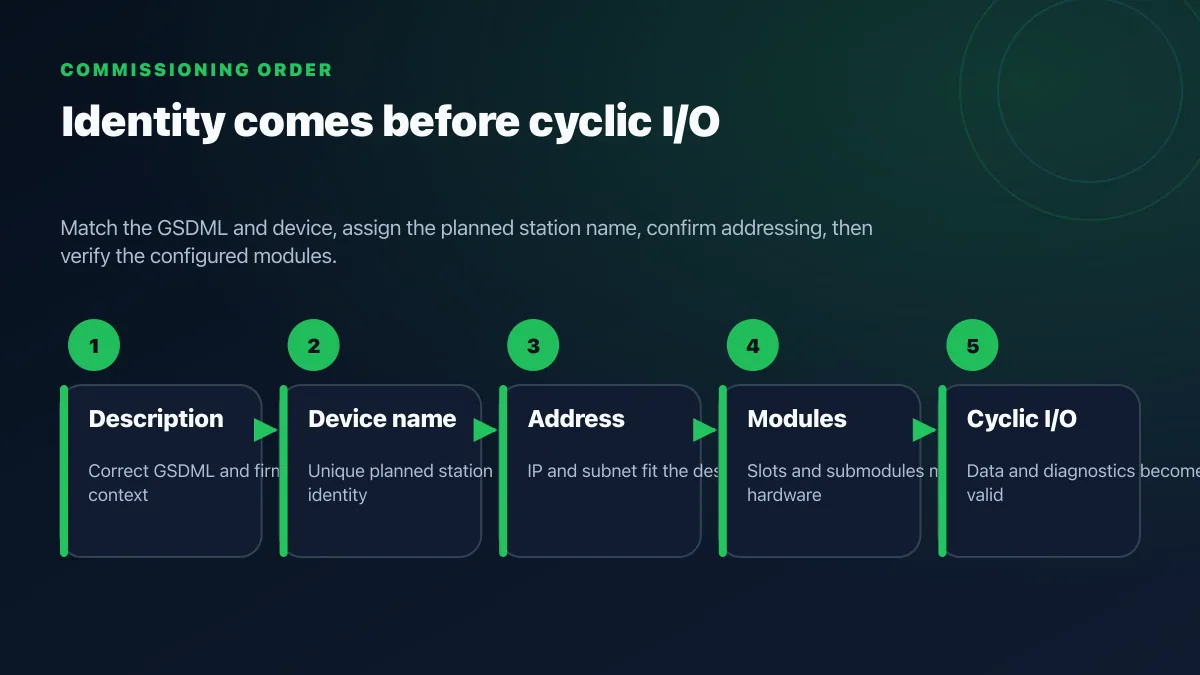
PROFINET is an industrial-Ethernet system in which an IO-Controller exchanges cyclic process data with configured IO-Devices. A successful commissioning proves five things in order: the correct device description is installed, the configured device name matches the physical device, modules and submodules match, cyclic I/O reaches the expected addresses, and the controller handles loss and recovery predictably.
This tutorial follows that commissioning path in TIA Portal. RT and IRT timing, topology limits and optional features vary by controller, device, conformance class and firmware; use the exact manuals and measure the loaded network instead of copying a generic cycle-time claim.
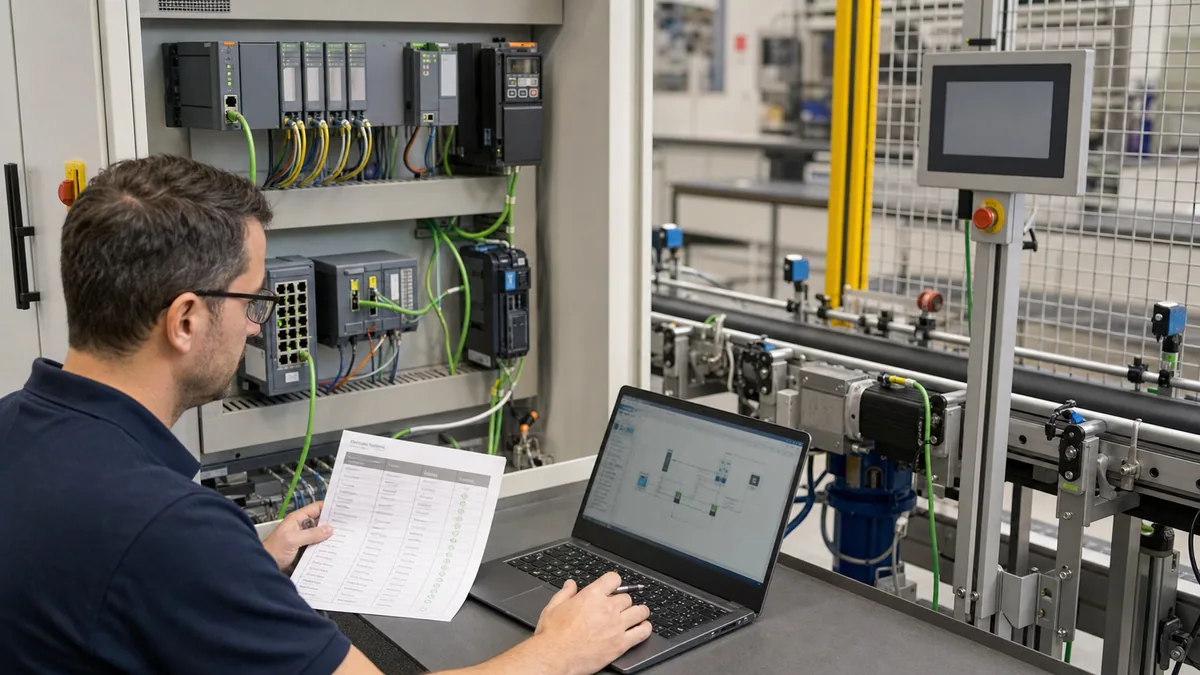
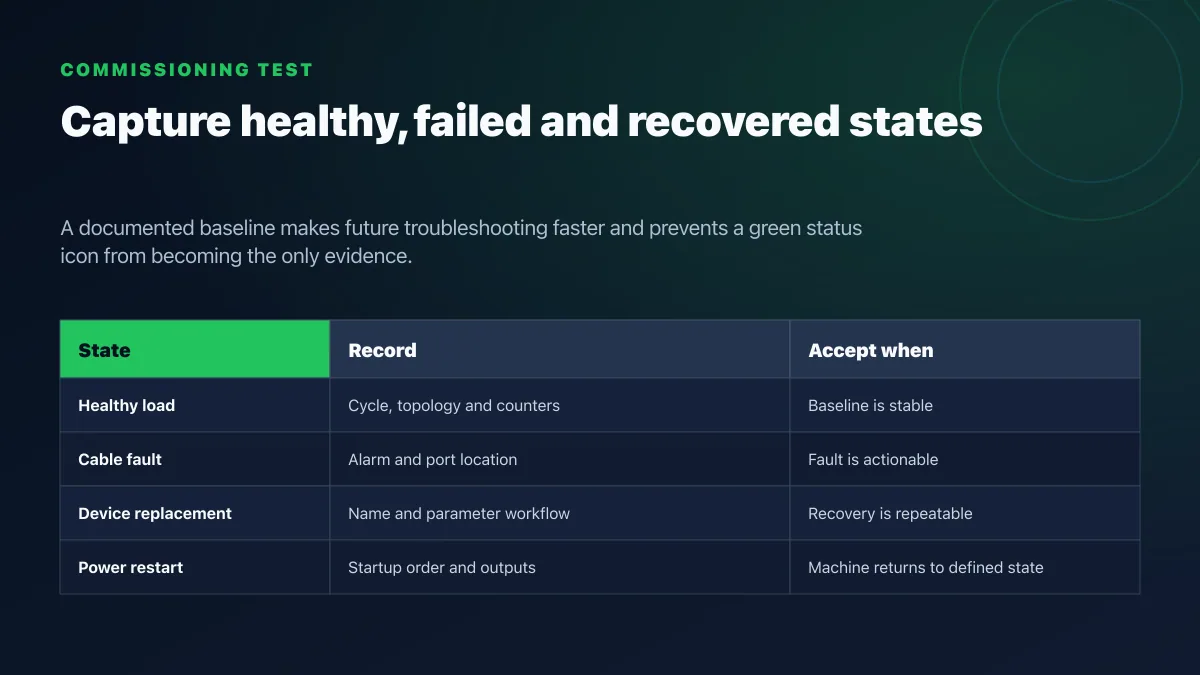
Minimum commissioning and recovery test matrix
| Test | Deliberate condition | Evidence to capture | Expected result |
|---|---|---|---|
| Baseline | Correct name, modules and wiring | Controller/device status and I/O values | Cyclic data valid; no diagnostic alarm |
| Missing name | Factory-reset or wrongly named device | DCP scan plus diagnostic buffer | Device identified but not placed in data exchange |
| Wrong module | Slot/subslot differs from project | Configured-versus-actual diagnostics | Data exchange rejected or affected module diagnosed |
| Cable loss | Disconnect one device link safely | Event timestamp and output behavior | Fault appears within the configured monitoring time; process response matches design |
| Recovery | Restore the same link | Recovery timestamp and state | Communication returns without an unintended machine restart |
| Duplicate identity | Introduce a duplicate name/IP only in a controlled lab | DCP/network diagnostics | Conflict is visible and commissioning is blocked |
| Loaded network | Run representative cyclic and acyclic traffic | Update-time/jitter measurements and dropped-alarm count | Measured performance stays inside the project acceptance limits |
Practice the PLC-side state and recovery logic in the browser before mapping it to real PROFINET I/O. The simulator does not emulate PROFINET timing or certify a network; use it to verify interlocks, timeout states and restart behavior.
Introduction: Configure PROFINET from identity to recovery
PROFINET uses Ethernet infrastructure while adding the device model, cyclic communication, diagnostics and engineering conventions needed for industrial control. For a deep-dive on how PROFINET differs from standard Ethernet, see the dedicated comparison guide; this tutorial focuses on practical configuration.
The guide covers RT and IRT, device roles, GSDML installation, network architecture, Media Redundancy Protocol (MRP), PROFIsafe context, TIA Portal setup and diagnostics. If you are comparing PROFINET against EtherNet/IP, Modbus TCP or another protocol, use the PLC communication protocols guide to establish project requirements first.
Work through the steps in an isolated lab or commissioning window. Record exact controller, firmware, GSDML version, topology, switch configuration and acceptance results so another engineer can reproduce the setup.
Chapter 1: PROFINET Protocol Overview
What is PROFINET?
PROFINET is the industrial-Ethernet system developed through PROFIBUS & PROFINET International (PI). It uses IEEE 802.3 Ethernet while defining controller/device relationships, cyclic communication, configuration, alarms, diagnostics, and application profiles for automation.
Three-Channel Communication Architecture:
PROFINET implements a sophisticated multi-channel approach where different communication types share the same physical network infrastructure while maintaining appropriate performance characteristics:
-
Non-real-time services: Handle engineering, parameter, diagnostic, and other acyclic traffic as supported by the selected devices. Embedded web servers or northbound IT interfaces are product-specific.
-
Real-Time (RT) Channel: Provides cyclic data exchange for automation without carrying the process data through TCP/IP. Supported update times and monitoring values depend on the controller, device and configured reduction ratio.
-
Isochronous Real-Time (IRT) Channel: Adds scheduled communication and time synchronisation for applications that require coordinated motion. Confirm the supported cycle and synchronisation values for every selected device.
Key PROFINET Characteristics:
- Ethernet physical layer: Uses supported industrial copper or fibre media, connectors, ports, and switches
- Real-time communication: Configured RT or IRT behavior must be verified against the application deadline
- Flexible Topology: Supports line, star, tree, and ring network configurations
- Comprehensive Diagnostics: Device-level diagnostics with detailed fault localization
- Device replacement options: Available behavior depends on controller, topology, device support and configuration
- Parallel services: Supported non-real-time services can coexist with cyclic traffic inside an engineered network
- Scalability: Controller and device limits are implementation-specific; size the network from the exact manuals
PROFINET History and Evolution
Origins and Development (1999-2003):
PROFIBUS International initiated PROFINET development to create a next-generation protocol combining proven PROFIBUS engineering concepts with Ethernet technology. The first PROFINET specification (V1.0) was published in 2003, introducing basic Real-Time communication and component-based engineering methodology. Early adoption focused on discrete manufacturing applications requiring Ethernet connectivity while maintaining the familiar PROFIBUS device model and data exchange principles.
IRT Introduction and Motion Control (2005-2007):
PROFINET V2.0 added Isochronous Real-Time (IRT) capabilities, enabling demanding motion control applications previously requiring specialized motion networks. Hardware-based IRT switches with time-synchronized frame forwarding delivered microsecond-level determinism needed for multi-axis servo systems, competing directly with established protocols like SERCOS III and EtherCAT. This advancement positioned PROFINET as a unified protocol for both I/O and motion applications.
Current optional capabilities:
Recent PROFINET versions incorporate advanced features supporting modern manufacturing requirements:
- Time-Sensitive Networking (TSN): IEEE 802.1 TSN integration for converged IT/OT networks
- OPC UA integration: Product-specific northbound interfaces and semantic models
- Security classes and functions: Product- and conformance-specific capabilities that still require a zone-and-conduit design
- Energy Management: Power consumption monitoring and optimization capabilities
- Wireless integration: Supported architectures for selected mobile applications
- Enhanced Diagnostics: Condition monitoring integration and predictive maintenance support
- Shared Device: Multi-master access to single devices for flexible architectures
Standardization and device selection:
PROFINET is specified within the IEC 61158 and IEC 61784 families. That does not make every combination plug-and-play: check the device's certificate, supported conformance class, GSDML version, controller catalog support and application profile before purchase.
PROFINET Versions: NRT, RT, IRT, and TSN
Non-Real-Time (NRT) Communication:
PROFINET NRT uses standard TCP/IP and UDP/IP protocols for non-time-critical communication including device parameterization, diagnostic data retrieval, web server access, and engineering functions. NRT communication shares the network with standard IT traffic and does not provide deterministic timing guarantees.
Typical NRT Applications:
- Device configuration and commissioning
- Diagnostic data access and visualization
- Recipe downloads and program transfers
- Web-based device management interfaces
- File transfers and firmware updates
Real-Time (RT) Communication:
PROFINET RT provides deterministic communication for standard automation applications using software-based frame processing. RT frames use Ethernet Layer 2 directly, bypassing the TCP/IP stack to reduce latency and improve determinism. Priority-based VLAN tagging ensures RT frames receive preferential treatment over standard network traffic.
RT design checks:
- Supported update-time range for the exact controller and IO-Device
- Watchdog/data-hold behavior and reduction ratio
- Switch support, topology and network load
- Required diagnostics and conformance class
- Measured performance with the representative project loaded
Isochronous Real-Time (IRT) Communication:
PROFINET IRT supports scheduled communication for motion control and synchronised applications. It requires IRT-capable devices and network components; the achievable cycle and synchronisation performance must be taken from the exact system manuals and verified in the engineering configuration.
IRT design checks:
- IRT support on every device and network component in the real-time domain
- Supported send clock, update time and synchronisation behavior
- Topology and bandwidth calculation from the engineering tool
- Motion-task relationship and measured axis behavior under load
- Recovery behavior after link or device faults
IRT Communication Phases:
IRT divides the communication cycle into three distinct phases:
- IRT Phase: Reserved time slot for synchronized IRT communication with hardware-based forwarding
- RT Phase: Time slot for standard RT communication using software-based processing
- NRT Phase: Remaining bandwidth available for TCP/IP and non-real-time traffic
This scheduled approach is intended to bound communication within the engineered IRT domain. The complete motion result still depends on controller tasks, devices, topology, drive loops, mechanics, and the configured schedule.
Time-Sensitive Networking (TSN) Integration:
PROFINET over TSN uses selected IEEE 802.1 mechanisms in supported products and profiles. Treat it as a product-level design decision: verify controller, device, switch, engineering-tool, conformance, scheduling, diagnostics, and coexistence support. Do not assume TSN automatically reduces cost, guarantees multi-vendor behavior, or permits uncontrolled IT traffic on the control network.
Chapter 2: PROFINET Device Types and Classes
PROFINET Device Categories
IO-Controller (Master Device):
The PROFINET IO-Controller functions as the master device in PROFINET networks, coordinating all communication, managing device configuration, and exchanging cyclic process data with IO-Devices. Typically implemented in PLCs like Siemens S7-1200, S7-1500, or industrial PCs running SCADA systems, the IO-Controller initiates all communication cycles and maintains the real-time connection with field devices.
IO-Controller Responsibilities:
- Establish and maintain connections with all IO-Devices
- Exchange cyclic input/output data with configured devices
- Manage device parameterization and startup procedures
- Monitor device status and process diagnostic information
- Execute control program logic and process automation sequences
- Handle alarm processing and event management
IO-Device (Slave Device):
PROFINET IO-Devices represent field equipment including distributed I/O modules, drives, sensors, actuators, and specialty devices that exchange process data with the IO-Controller. IO-Devices respond to controller communication, provide input data, accept output data, and report diagnostic information without initiating communication independently.
Common IO-Device Types:
- Distributed I/O modules (digital/analog inputs and outputs)
- Variable frequency drives and servo amplifiers
- HMI panels and operator interfaces
- Field instruments (transmitters, analyzers, actuators)
- Safety devices (light curtains, safety PLCs, emergency stops)
- Vision systems and barcode scanners
- Remote I/O stations and fieldbus gateways
IO-Supervisor (Engineering and Diagnostics):
IO-Supervisors are engineering stations, HMI systems, or diagnostic tools that access PROFINET networks for commissioning, parameterization, monitoring, and troubleshooting without participating in real-time cyclic data exchange. Supervisors use standard TCP/IP communication to access device configuration and diagnostic information.
Typical IO-Supervisor Functions:
- Network commissioning and device configuration
- Topology discovery and network visualization
- Advanced diagnostics and troubleshooting
- Firmware updates and parameter management
- Performance monitoring and traffic analysis
- Documentation generation and backup/restore operations
PROFINET Device Roles at a Glance
The three roles work together on every PROFINET network. Understanding which hardware fills each role is the first step before configuration.
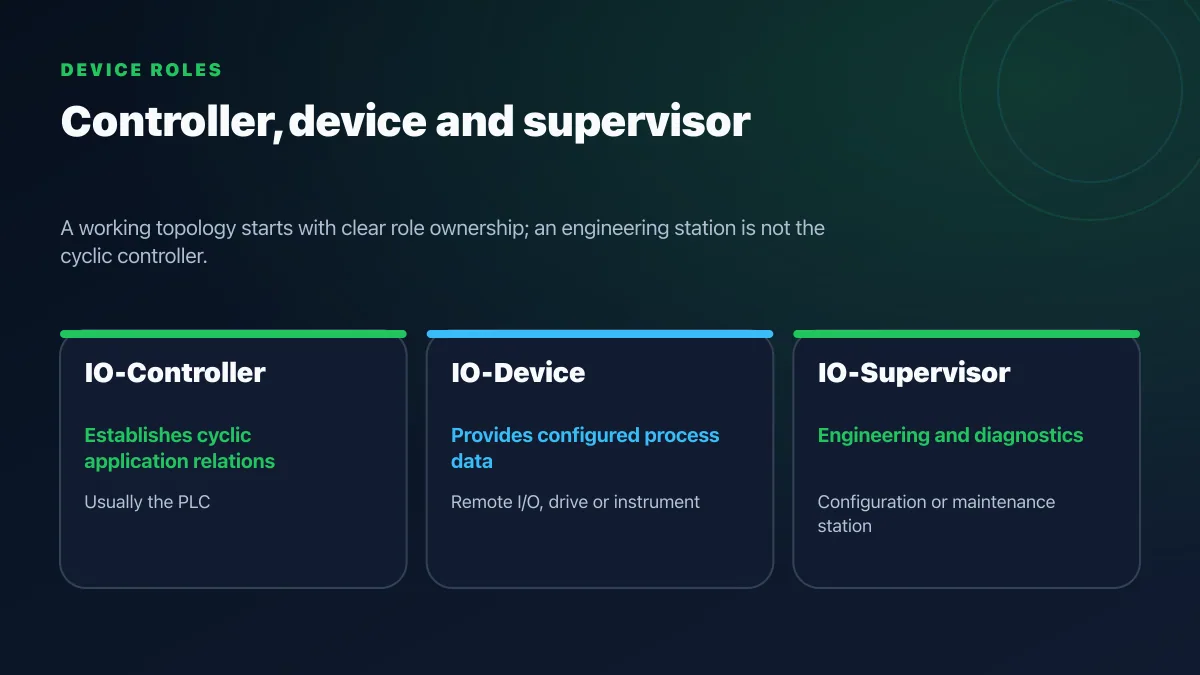
| Role | Who plays it | Communicates how | Typical examples |
|---|---|---|---|
| IO-Controller | The PLC running the automation program | Initiates all cyclic data exchange; manages device startup and alarms | Siemens S7-1500, S7-1200, S7-300 PN |
| IO-Device | Field equipment at the machine | Responds to the controller; sends inputs, accepts outputs | ET 200SP remote I/O, Sinamics drives, HMI panels, sensors with PN interfaces |
| IO-Supervisor | Engineering or diagnostic station | Read-only / acyclic via TCP/IP; does not run cyclic I/O | TIA Portal laptop, PRONETA workstation, SCADA with PN access |
A single network can have multiple IO-Controllers (each owning their own set of IO-Devices), but each IO-Device is owned by exactly one IO-Controller at a time unless the Shared Device feature is used.
PROFINET Conformance Classes
PI conformance classes group required protocol functions; they are not universal cycle-time bands or application labels.
| Class | Core distinction to verify | Project evidence |
|---|---|---|
| CC-A | Basic PROFINET IO communication and required diagnostics | Certificate, GSDML, controller support, configured update and fault test |
| CC-B | Adds topology and network-diagnostic functions defined for the class | LLDP/topology record, port diagnostics, replacement and maintenance workflow |
| CC-C | Adds IRT functions for synchronized communication | End-to-end CC-C support, engineered schedule, synchronization and motion trace |
A certificate narrows conformance risk; it does not prove that two specific products implement the application profile, optional feature, firmware combination, or performance your project needs.
PROFINET Device Identification
Every PROFINET device includes specific identification information enabling proper network configuration and device management:
Device Name: The unique PROFINET device name identifies each device on the network using DNS-compatible naming conventions (e.g., "servo-drive-01", "io-module-station-3"). Device names are assigned during configuration and stored persistently in device memory.
Device Type and Vendor Information: Devices identify their type, model, vendor, and firmware version through standardized identification records. This information enables engineering tools to automatically configure devices with appropriate parameters and display device-specific capabilities.
Station Number vs. Device Name: Unlike traditional fieldbus systems using numeric station addresses, PROFINET uses symbolic device names for identification. While some PROFINET devices support legacy numeric addressing for compatibility, modern PROFINET systems rely exclusively on device names for network communication.
Chapter 3: PROFINET Network Architecture and Topology
Network Topology Options
Line (Daisy-Chain) Topology:
Line topology connects PROFINET devices in series, with each device providing two Ethernet ports enabling data to pass through to the next device. This simple topology minimizes cabling costs and works well for production lines, conveyor systems, and other linear machine arrangements.
Line Topology Advantages:
- Minimal cable length and installation cost
- Simple cable routing following machine layout
- Easy network extension by adding devices to the end
- Natural fit for linear production processes
- Reduced switch requirements for small networks
Line Topology Considerations:
- Single cable failure affects downstream devices
- Cable diagnostics more challenging than star topology
- Device order affects communication performance in large networks
- Maximum cable segments limited by Ethernet specifications (100m per segment)
Star Topology:
Star topology connects each device directly to a central switch, providing dedicated communication paths and simplified troubleshooting. This topology suits applications with devices distributed across a facility or production cell where centralized wiring is practical.
Star Topology Advantages:
- Cable fault affects only single device (improved fault isolation)
- Simplified diagnostics with dedicated device connections
- Flexible device placement without topology constraints
- Easy troubleshooting with individual cable testing
- Scalable design supporting network growth
Star Topology Considerations:
- Higher cable costs (dedicated run to each device)
- Requires switches to interconnect devices
- Central switch becomes critical single point of failure (unless redundant)
- Cable length limitations (100m from switch to device)
Ring Topology with Media Redundancy (MRP):
Ring topology connects devices in a closed loop where the last device connects back to the first, creating redundant communication paths. Media Redundancy Protocol (MRP) monitors the ring and automatically switches to the backup path if a cable or port failure occurs, providing network resilience for critical applications.
Ring Topology Advantages:
- Alternate-path recovery where every participant supports the configured redundancy mode; measure the actual interruption against the process limit
- Network continues operating with single cable break
- Suitable for critical infrastructure requiring high availability
- No single point of failure (except controller if not redundant)
- Simplified topology for distributed equipment
Ring Topology Considerations:
- Requires MRP-capable devices and switches
- Slightly higher latency during normal operation
- Ring manager device required to control MRP operation
- Two cable failures in ring cause network segmentation
Tree and Hybrid Topologies:
Complex automation systems often use hybrid topologies combining line, star, and ring configurations to optimize performance, cost, and reliability based on specific machine or process requirements. Modern PROFINET networks seamlessly support mixed topologies with proper switch selection and network design.
PROFINET Network Design Best Practices
Network Segmentation:
Large PROFINET systems should be segmented into logical subnets that group related devices based on functional areas, control zones, or performance requirements. Proper segmentation improves performance, simplifies troubleshooting, and enhances network security.
Segmentation Strategies:
- Separate IRT and RT devices into dedicated subnets for optimal performance
- Group devices by control zone or production cell for logical organization
- Isolate high-traffic devices (vision systems, HMI panels) to prevent bandwidth congestion
- Use VLANs to logically separate traffic on shared physical infrastructure
- Implement router-based segmentation for large multi-area systems
Switch Selection and Placement:
Proper switch selection directly impacts PROFINET network performance, reliability, and diagnostic capabilities:
Unmanaged Switches:
- Suitable only for small RT networks without advanced features
- No VLAN support, prioritization, or diagnostics
- Lowest cost but limited performance and troubleshooting capabilities
Managed Switches:
- VLAN configuration for traffic separation and prioritization
- Port mirroring for diagnostic traffic analysis
- SNMP support for network monitoring and management
- Quality of Service (QoS) for traffic prioritization
- Required for networks with both RT and IT traffic
IRT Switches:
- Hardware-based time scheduling for deterministic IRT communication
- Distributed Clock synchronization support
- Required for any network segment containing IRT devices
- Higher cost but necessary for motion control applications
Network Planning Tools:
Siemens provides network planning and configuration tools that assist with PROFINET network design:
PRONETA (PROFINET Network Analysis Tool):
- Topology discovery and network scanning
- Device identification and configuration verification
- Network performance analysis and cable testing
- Installation testing and commissioning support
TIA Selection Tool:
- Hardware selection and system configuration
- Performance calculations and cycle time estimation
- Network load analysis and optimization recommendations
- Bill of materials generation for procurement
Cable and Installation Requirements
Select the cabling system from PI installation guidance and the exact device-port manuals. Category alone does not establish suitability. Record:
- copper or fibre type, connector family, pinout, and port compatibility;
- fixed, flexible, torsion, trailing, outdoor, chemical, temperature, and ingress requirements;
- permitted channel length, bend radius, pulling tension, routing, separation, and mechanical protection;
- shield termination and equipotential-bonding method from the applicable installation design;
- installed-link test method and acceptance result;
- field-repair and spare connector procedure.
Do not apply a generic “ground one end” rule to PROFINET cable shields. Follow the current PI grounding/bonding guidance, machinery electrical design, cable system, and site EMC assessment.
Maximum Cable Lengths:
Cable category, connector, conductor type, environment and maximum channel length must follow the selected PROFINET cabling guideline and device port specifications. A commonly encountered twisted-pair Ethernet channel limit is 100 m, but do not convert that into a universal machine rule: flexible robotic cable, M12 variants, FastConnect construction and fibre transceivers each have their own limits. Document every segment and test the installed link.
PROFIsafe: Functional Safety Over PROFINET
PROFIsafe is a safety application profile designed for use over a black communication channel such as PROFINET. In a supported architecture, certified safety controllers and devices can share network infrastructure with standard traffic. The complete safety function still needs its risk-derived requirements, certified components, response-time calculation, verification, and validation.
How PROFIsafe achieves safety integrity:
PROFIsafe wraps each safety telegram in an additional safety layer with:
- A unique F-Address per device to prevent message misrouting
- A CRC checksum for data integrity detection
- Consecutive numbering to catch lost, repeated, or reordered messages
- A watchdog/timeout to detect communication failure
- An acknowledgment mechanism to confirm safe state reception
PROFIsafe supports safety applications up to the capability stated by PI and the certified components. The achieved SIL or Performance Level belongs to the complete validated safety function—not to the network profile by itself.
For a Siemens/TIA Portal implementation, verify:
- the required TIA Portal Safety licence and supported software release;
- the selected F-CPU and F-Device certificates and safety manuals;
- supported GSDML, firmware, F-address, monitoring-time, and signature workflow;
- the site's safety-program authorization, change-control, download, and validation procedure.
PROFIsafe and standard traffic can share PROFINET infrastructure. Include all configured cyclic traffic in the network and controller load calculation, set the F-monitoring time from the validated response-time calculation, and test the actual fault response. Full configuration context is in Chapter 7: PROFINET Safety (PROFIsafe) below.
GSDML Files Explained
Before you can add a third-party IO-Device to a TIA Portal project, you need its GSDML file (Generic Station Description Markup Language). This is an XML-formatted device description provided by the manufacturer — think of it as the device's "driver" for TIA Portal's hardware catalog.
What a GSDML File Contains
| Section | Contents |
|---|---|
| Device identity | Vendor ID, Device ID, firmware revision, product family |
| Module definitions | Every slot/subslot the device supports, with plug-in rules |
| I/O data sizes | Byte lengths for cyclic input and output data per module |
| Parameter records | Acyclic parameters (e.g., filter times, scaling) with valid ranges |
| Supported RT classes | Whether the device supports RT only, or also IRT |
| Alarm capabilities | Which diagnostic and maintenance alarms the device can generate |
A GSDML file is named following the PI convention: GSDML-Vx.x-[Vendor]-[DeviceFamily]-[date].xml. The version number (e.g., V2.35) refers to the GSDML schema version, not the device firmware.
Where to Get GSDML Files
- Manufacturer's website — the primary source; search for "[device model] GSDML download"
- PI (PROFIBUS & PROFINET International) GSDML database at profibus.com
- TIA Portal's built-in catalog — Siemens devices are pre-installed; no manual import needed
- Device USB/CD media — older devices may ship with the file on physical media
Always download the GSDML version that matches your device's installed firmware. Mismatched versions can cause configuration errors or missing module options.
Installing a GSDML File in TIA Portal
- In TIA Portal, go to Options → Manage general station description files (GSD)
- Click Browse and navigate to the downloaded
.xmlfile - Select the file and click Install
- Wait for the "Installation completed successfully" message
- The device now appears under Hardware catalog → Other field devices → PROFINET IO
After installation, the device stays in the catalog for all future projects — you only install once per TIA Portal installation.
Updating a GSDML File
If you upgrade device firmware and download the new GSDML, re-install following the same steps. TIA Portal keeps both versions; select the correct version when adding the device to your network view. For existing devices already in a project, right-click the device and choose Update device to migrate to the new GSDML version.
RT vs IRT: Choosing a Communication Class
One of the most common questions when designing a PROFINET network is whether a device needs RT or IRT. The performance specifications are well-documented, but the practical decision framework is what engineers actually need in the field.
Decision Table: RT or IRT?
| Application | Requirement to establish | Candidate class |
|---|---|---|
| Conveyor I/O, discrete sensors | Maximum acceptable input-to-output delay and pulse capture | Usually RT |
| Process control | Loop sample time, dead time and controller-task relationship | Usually RT |
| Speed-controlled drive | Command/feedback update and fault-response time | Often RT |
| Coordinated servo axes | Synchronisation and motion-error budget | Evaluate IRT |
| Robotics or synchronised manufacturing | Vendor motion profile and topology requirements | Evaluate IRT |
| Safety I/O via PROFIsafe | Validated safety response time and F-monitoring time | Per the certified safety design |
Use RT when:
- The measured update time and variation remain inside the process or motion budget
- The controller, devices, and switches support the required RT features and diagnostics
- The application does not require an IRT-only motion or synchronization function
- The loaded-network and fault-recovery tests pass
Use IRT when:
- The motion design and selected device manuals explicitly require IRT synchronisation
- Every controller, device, and network component in the scheduled path supports the intended IRT configuration
- The engineering tool can calculate and validate the topology and bandwidth
- The measured synchronization and motion-error budget passes under representative load
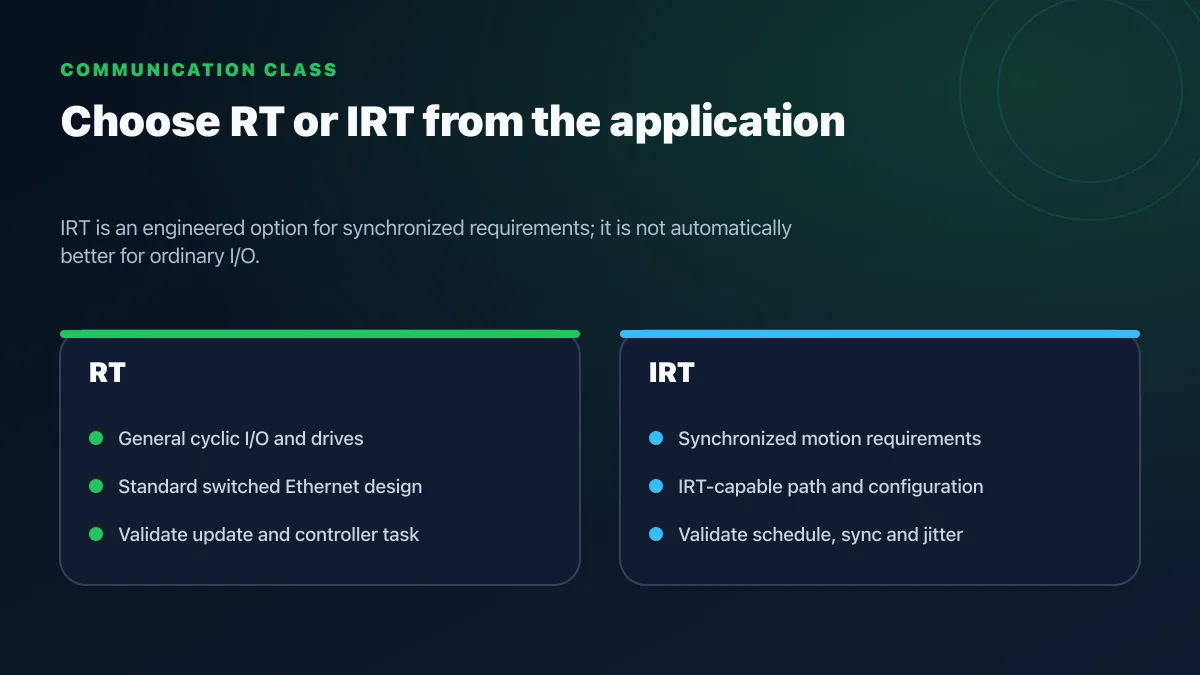
Infrastructure implication: build the IRT domain from the exact controller, device, topology, and switch manuals. Do not assume an Ethernet port or a product family label proves IRT support.
For a full technical comparison of PROFINET against standard Ethernet — including frame prioritization, protocol stack differences, and IT/OT convergence implications — see how PROFINET differs from standard Ethernet.
Chapter 4: Step-by-Step PROFINET Configuration Tutorial in TIA Portal
This comprehensive PROFINET configuration tutorial demonstrates complete network setup using Siemens TIA Portal with S7-1500 PLC and distributed I/O devices.
Prerequisites and Project Setup
Required Components:
- TIA Portal V17 or newer installed and licensed
- S7-1500 CPU with PROFINET interface (e.g., CPU 1513-1 PN)
- PROFINET IO-Devices (distributed I/O modules, drives, or simulated devices)
- Physical network infrastructure (switches, cables) or virtual commissioning environment
Creating New TIA Portal Project:
Step 1: Launch TIA Portal and Create Project
- Start TIA Portal application
- Select "Create new project" from startup screen
- Enter project name: "PROFINET_Tutorial_Project"
- Select project path and storage location
- Click "Create" to initialize new project
Step 2: Add PLC Hardware
- Click "Devices & networks" in project tree
- Select "Add new device" from toolbar
- Navigate to "SIMATIC S7-1500" controller family
- Select "CPU 1513-1 PN" (or your specific CPU model)
- Confirm firmware version (use latest available)
- Click "OK" to add controller to project
Step 3: Configure CPU Properties
- Select CPU in hardware configuration view
- Open "Properties" tab in inspector window
- Configure "PROFINET interface [X1]" settings:
- Interface name: "PLC_1"
- IP address: 192.168.0.10
- Subnet mask: 255.255.255.0
- Router address: (leave empty for local subnet)
- Enable "Support device replacement without removable media" for easy device swapping
- Save project (Ctrl+S)
Step 1 — Import the GSDML File (Third-Party Devices)
For Siemens devices (ET 200SP, SCALANCE, Sinamics) skip this step — they are pre-installed. For any third-party IO-Device you must install the GSDML file before the device appears in the catalog.
- Download the correct GSDML
.xmlfile for your device and firmware version from the manufacturer's website - In TIA Portal go to Options → Manage general station description files (GSD)
- Click Browse, select the
.xmlfile, then click Install - Confirm "Installation completed successfully"
- The device now appears under Hardware catalog → Other field devices → PROFINET IO
Step 2 — Add the IO-Device to the Network View
Adding Distributed I/O Modules:
Step 1: Open Hardware Catalog
- In "Devices & networks" view, ensure hardware catalog panel is visible
- Navigate to "Other field devices" → "PROFINET IO" → "I/O"
- Locate your specific I/O module family (e.g., ET 200SP)
Step 2: Add IO-Device to Network
- Drag desired I/O station (e.g., "IM 155-6 PN ST" for ET 200SP) from catalog to network view
- Position device graphically near the controller
- TIA Portal automatically creates unassigned device on PROFINET subnet
Step 3: Assign Device to Controller
- Select the newly added IO-Device in network view
- In properties, locate "PLC connection" or "Assigned to" setting
- Select your S7-1500 controller as the IO-Controller
- Device icon changes to indicate successful controller assignment
Step 4: Configure Device Network Settings
- Select IO-Device and open "Properties" → "PROFINET interface"
- Configure device name: "IO_Station_01" (use descriptive, unique names)
- IP address: 192.168.0.11 (within same subnet as controller)
- Enable "Device replacement without removable media" for simplified maintenance
- Set "Generate LLDP telegrams" for topology detection
Step 5: Add I/O Modules to Device
- Double-click IO-Device to open device view
- Hardware catalog shows compatible modules for selected IO-Device
- Drag modules to available module slots:
- Slot 1: DI 16x24VDC ST (16 digital inputs)
- Slot 2: DQ 16x24VDC/0.5A ST (16 digital outputs)
- Slot 3: AI 4xU/I 2-wire ST (4 analog inputs)
- Module addresses are automatically assigned sequentially
Step 6: Configure Module Properties
- Select each module to configure specific parameters:
- Input filter times for noise immunity
- Diagnostic interrupt settings for fault detection
- Channel parameter assignment
- Substitute values for outputs during CPU stop
- Enable "Supply alarm" and "Channel alarm" for comprehensive diagnostics
Configuring PROFINET Communication Parameters
Setting Device Communication Parameters:
Real-Time (RT) Configuration:
-
Select IO-Device in network view
-
Navigate to "Properties" → "PROFINET interface" → "Real-time settings"
-
Configure RT communication parameters:
- Choose a send clock and reduction ratio supported by the controller and IO-Device
- Derive the resulting update time from the application deadline and loaded-network calculation
- Set watchdog/data-hold behavior from the required fault-detection and process response, not a generic multiplier
- Retain the engineering-tool network calculation and measured result
-
Configure I/O data transfer optimization:
- Review the configured modules, submodules, process-data length, and addresses
- Remove only unused configuration that the device manual permits
- Confirm diagnostics and acyclic parameter access remain available where required
IRT Configuration (for Motion Control):
For applications requiring Isochronous Real-Time communication:
-
Change device to IRT mode:
- Select IO-Device → "Properties" → "PROFINET interface" → "Real-time settings"
- Change "RT class" from "RT" to "IRT"
- Confirm IRT-capable switches installed in network
-
Configure IRT timing parameters:
- Select supported send clock, update time, and application cycle from the motion design
- Confirm the controller task and drive cycle relationship
- Verify the engineered IRT phase, bandwidth, and topology
- Measure synchronization and following error under representative load
-
Synchronization domain configuration:
- Review the synchronization domain created or selected by the engineering workflow
- Confirm the synchronization master and every participating device
- Verify the permitted topology in the current controller, switch, and device manuals
Network Address Assignment
IP Address Planning:
Systematic IP address assignment simplifies network management and troubleshooting:
Illustrative isolated-lab address scheme only:
- Controllers: 192.168.0.1 - 192.168.0.99
- Distributed I/O: 192.168.0.100 - 192.168.0.199
- Drives: 192.168.0.200 - 192.168.0.249
- HMI Panels: 192.168.0.250 - 192.168.0.254
Device Name Conventions:
Use descriptive, consistent device naming:
- Include device type, location, and sequence number
- Examples: "IO_Station_Zone1_01", "Drive_Conveyor_Main", "HMI_Operator_Station"
- Avoid spaces and special characters (use underscores or hyphens)
- Maximum 240 characters (keep practical names <30 characters)
Compiling Configuration and Download
Step 1: Compile Project
- Select PLC device in project tree
- Click "Compile" button (or press Ctrl+F11)
- Review compilation results in info panel
- Address any errors or warnings before download
Step 2: Establish Online Connection
- Connect programming computer to PROFINET network
- Select PLC in project tree
- Click "Online" → "Extended download to device"
- Select "PN/IE" interface type
- Choose correct network interface adapter
- Click "Start search" to locate PLC on network
- Select discovered CPU and click "Download"
Step 3: Download Configuration
- TIA Portal displays download preview showing changes
- Confirm download action (hardware and software)
- Monitor download progress
- PLC automatically switches to STOP mode
- Wait for completion message
Step 3 — Assign a Device Name via DCP (the Step Beginners Miss)
Why this matters: A PROFINET device straight out of the box has no name. The IO-Controller uses the device name — not the IP address — to identify and connect to an IO-Device at startup. If the name is missing or wrong, the device will show as unreachable regardless of correct IP settings. The assignment is done once using DCP (Discovery and Configuration Protocol), which broadcasts over Ethernet Layer 2 to reach unconfigured devices.
Step 4: Assign Device Names (First Installation)
For new devices without assigned names:
- Open "Online & diagnostics" view
- Navigate to Functions → Assign device name
- Click Scan network — TIA Portal sends DCP Identify requests and lists all unassigned PROFINET devices found by MAC address
- Match physical devices to configured devices by:
- MAC address verification (labeled on device)
- Topology position (location in network)
- Temporary LLDP identification (click Flash LED to blink the device's status light)
- Select the device, confirm the target name shown matches your project, then click Assign name — DCP writes the name into non-volatile flash memory on the device
- The device will now request its IP address from the IO-Controller automatically on next power-up
Device name rules: Names are case-insensitive, max 240 characters, DNS-compatible (letters, digits, hyphens only — no underscores, no spaces). Keep practical names short: io-station-01, drive-conveyor-a.
Step 5: Switch PLC to RUN Mode
- Open "Online tools" → "Operating mode"
- Switch CPU from STOP to RUN mode
- Verify IO-Devices establish communication
- Monitor device status in diagnostics view
Parameter Assignment and Advanced Configuration
Device Parameter Assignment:
Many PROFINET devices support acyclic parameter transfer during startup:
-
Select IO-Device module requiring parameters
-
Navigate to module properties → "Parameter assignment"
-
Configure device-specific parameters:
- Measurement range settings for analog modules
- Scaling factors and engineering units
- Alarm thresholds and diagnostic settings
- Operating modes and special functions
-
Parameters download automatically during device startup
-
Verify parameter acceptance in device diagnostics
Shared Device Configuration:
For devices accessed by multiple controllers:
- Add same IO-Device to multiple controller configurations
- Configure "Shared device" mode in device properties
- Assign specific modules/slots to each controller
- Define data exchange areas for inter-controller communication
- Coordinate I/O access rights to prevent conflicts
Diagnostics and Status Monitoring Setup
Enabling Comprehensive Diagnostics:
-
Configure controller diagnostic settings:
- Select CPU → "Properties" → "System diagnostics"
- Enable "System diagnostics" option
- Configure diagnostic buffer size (10,000+ entries recommended)
-
Configure IO-Device diagnostics:
- Select each IO-Device → "Properties" → "PROFINET interface"
- Enable "Generate LLDP telegrams" for topology discovery
- Enable "Station status alarm" and "Update alarm" for comprehensive monitoring
-
Configure module-level diagnostics:
- Select individual modules
- Enable "Module status alarm", "Channel alarm", "Maintenance alarm"
- Configure alarm thresholds and maintenance intervals
- Set up diagnostic interrupts if required
Web Server Access Configuration:
Enable built-in web server for remote diagnostics:
- Select CPU → "Properties" → "Web server"
- Enable "Web server" option
- Configure user authentication and access rights
- Set permitted operations (read-only or full access)
- Access web interface via browser: http://192.168.0.10 (PLC IP address)
Chapter 5: PROFINET Programming Examples
Reading and Writing PROFINET I/O Data
PROFINET IO-Devices exchange data with the PLC controller through automatically mapped process image areas. TIA Portal assigns absolute addresses to all configured I/O points based on module configuration.
Accessing Digital Inputs (Ladder Logic):
// Read digital input from PROFINET IO-Device
// Address I0.0 = First input of first digital input module
// Address I0.1 = Second input of same module

Network 1: "Motor Start Button"
    |  %I0.0      "Motor_Run"   "Motor_Output"
    |--| |--------|/|------------( )------------|
    |  Start      Not_Running    Motor_Coil
Accessing Digital Outputs (Ladder Logic):
Network 2: "Motor Control Output"
    |  "Motor_Output"      %Q0.0
    |--| |-----------------( )------------|
    |  Internal_Bit        PROFINET_Output
SCL Programming for I/O Access:
// Structured Control Language example for PROFINET I/O access

// Read digital inputs from PROFINET module
VAR
    Start_Button : BOOL;
    Stop_Button : BOOL;
    Motor_Running : BOOL;
    Conveyor_Speed : INT;
END_VAR

// Map PROFINET inputs to symbolic variables
Start_Button := "IO_Station_01".DI_01.Input_Channel_0;  // Symbolic addressing
Stop_Button := %I0.1;                                     // Absolute addressing

// Read analog input (0-27648 for ±10V range)
Conveyor_Speed := "IO_Station_01".AI_01.Analog_Input_Channel_0;

// Write digital outputs
IF Start_Button AND NOT Stop_Button THEN
    Motor_Running := TRUE;
ELSIF Stop_Button THEN
    Motor_Running := FALSE;
END_IF;

"IO_Station_01".DO_01.Output_Channel_0 := Motor_Running;  // Symbolic
%Q0.0 := Motor_Running;                                     // Absolute
Working with Process Data Objects (PDOs)
Consistent Data Exchange:
For applications requiring consistent data snapshots across multiple I/O points:
// Consistent data transfer using RDREC (Read Record)
// Ensures all values read simultaneously from device

VAR
    ReadRequest : Bool;
    ReadDone : Bool;
    ReadError : Bool;
    InputData : Array[0..15] of BYTE;
    RDREC_Instance : RDREC;
END_VAR

// Trigger consistent read operation
IF ReadRequest THEN
    RDREC_Instance(
        REQ := TRUE,
        ID := "IO_Station_01".HW_Identifier,
        INDEX := 16#8000,     // Standard input record
        MLEN := 16,           // Data length in bytes
        VALID => ReadDone,
        BUSY => ,
        ERROR => ReadError,
        STATUS => ,
        LEN => ,
        RECORD := InputData
    );
    ReadRequest := FALSE;
END_IF;
Acyclic Communication with PROFINET Devices
Parameter Read/Write Operations:
// Write parameters to PROFINET device using WRREC

VAR
    WriteParameters : Bool;
    WriteComplete : Bool;
    WriteError : Bool;
    ParameterData : Array[0..7] of BYTE;
    WRREC_Instance : WRREC;
END_VAR

// Prepare parameter data
ParameterData[0] := 16#05;  // Example parameter byte
ParameterData[1] := 16#A0;

// Write parameters to device
IF WriteParameters THEN
    WRREC_Instance(
        REQ := TRUE,
        ID := "Drive_Axis_01".HW_Identifier,
        INDEX := 16#80A0,     // Parameter index
        LEN := 8,             // Parameter length
        DONE => WriteComplete,
        BUSY => ,
        ERROR => WriteError,
        STATUS => ,
        RECORD := ParameterData
    );
    WriteParameters := FALSE;
END_IF;
Drive Control via PROFINET (PROFIdrive)
Standard Drive Telegram Configuration:
Most PROFINET drives use PROFIdrive profile for standardized control:
// PROFIdrive Standard Telegram 1 control example

TYPE "PROFIdrive_Telegram1"
STRUCT
    // Control Word (STW1)
    Control_Word : WORD;
    // Speed Setpoint (NSOLL_A)
    Speed_Setpoint : INT;      // -16384 to +16383 (±200%)
    // Status Word (ZSW1) - from drive
    Status_Word : WORD;
    // Actual Speed (NIST_A) - from drive
    Actual_Speed : INT;
END_STRUCT
END_TYPE

VAR
    Drive_Control : "PROFIdrive_Telegram1";
    Drive_Enable : BOOL;
    Target_Speed : REAL;       // Engineering units (RPM)
END_VAR

// Map symbolic drive data
Drive_Control := "VFD_Conveyor_01".Telegram_1;

// Control word bit assignments
Drive_Control.Control_Word.%X0 := TRUE;        // ON command
Drive_Control.Control_Word.%X1 := FALSE;       // No coast stop
Drive_Control.Control_Word.%X2 := FALSE;       // No quick stop
Drive_Control.Control_Word.%X3 := Drive_Enable; // Enable operation

// Scale engineering units to setpoint (-16384 to +16383 = ±200% rated speed)
Drive_Control.Speed_Setpoint := REAL_TO_INT(Target_Speed / 1500.0 * 16384.0);

// Read drive status
IF Drive_Control.Status_Word.%X2 THEN
    // Drive ready for operation
END_IF;
PROFINET Diagnostics Programming
Monitoring Device Status:
// Automatic PROFINET device diagnostics monitoring

VAR
    Device_OK : BOOL;
    Device_Fault : BOOL;
    Device_Maintenance : BOOL;
    Device_DiagData : Array[0..255] of BYTE;
    GetDiag_Instance : Get_IM_Data;
END_VAR

// Check IO-Device status using system functions
CALL GetDiag_Instance(
    LADDR := "IO_Station_01".HW_Identifier,
    IM_TYPE := 1,                  // Identification data
    DATA => Device_DiagData,
    DONE => ,
    BUSY => ,
    ERROR => Device_Fault
);

// Monitor device reachability using DeviceStates
Device_OK := DeviceStates(LADDR := "IO_Station_01".HW_Identifier).DeviceOK;
Device_Fault := DeviceStates(LADDR := "IO_Station_01".HW_Identifier).DeviceFault;
Device_Maintenance := DeviceStates(LADDR := "IO_Station_01".HW_Identifier).MaintenanceRequired;
Chapter 6: PROFINET Diagnostics and Troubleshooting
Built-in TIA Portal Diagnostic Tools
Online Diagnostics View:
TIA Portal provides comprehensive online diagnostics for connected PROFINET systems:
Accessing Diagnostics:
- Establish online connection to PLC
- Right-click device → "Online & diagnostics"
- Navigate diagnostic categories:
- Diagnostics: Real-time device status and fault information
- Topology: Network structure visualization and cable diagnostics
- Device tags: I/O status and data value monitoring
- Statistics: Communication statistics and performance metrics
Device Status Interpretation:
Status Indicators:
- Green: Device operational, communication established
- Yellow: Device operational with maintenance required or configuration mismatch
- Red: Device fault or communication failure
- Gray: Device configured but not detected on network
Topology View and Cable Testing:
Network Topology Display:
- Open "Online & diagnostics" → "Topology"
- TIA Portal displays actual network structure discovered via LLDP
- Compare actual topology to configured topology
- Identify topology mismatches indicating incorrect cabling
Cable Diagnostics:
- Select network connection in topology view
- View cable quality indicators:
- Cable length: Measured distance to connected device
- Cable quality: Signal quality assessment (Good/Acceptable/Poor)
- TX/RX statistics: Packet counters and error rates
- Locate cable faults by approximate distance measurement
Common PROFINET Issues and Solutions
Device Not Detected:
Symptoms: IO-Device shows gray in diagnostic view, no communication established
Troubleshooting Steps:
-
Verify physical connectivity:
- Check cable connections at both ends
- Verify link LEDs on device and switch ports are illuminated
- Test cable continuity with cable tester
- Confirm correct cable type (straight-through for switch connections)
-
Check IP address configuration:
- Verify device IP address within same subnet as controller
- Ensure no IP address conflicts with other devices
- Confirm subnet mask matches controller configuration
- Test network connectivity using PING from engineering station
-
Verify device name assignment:
- Unassigned devices cannot establish PROFINET communication
- Use "Assign device name" function in TIA Portal
- Confirm device name matches project configuration exactly (case-sensitive)
- Check device supports PROFINET (some devices require specific firmware)
-
Review network configuration:
- Verify VLAN configuration if using managed switches
- Confirm switch ports not blocked by security settings
- Check switch configuration allows PROFINET protocol
- Disable IGMP snooping on switches (can interfere with PROFINET)
Communication Timeouts and Cyclic Faults:
Symptoms: Device intermittently goes to fault state, communication watchdog timeouts
Troubleshooting Steps:
-
Check network load:
- Excessive network traffic delays RT communication
- Use network analyzer to measure bandwidth utilization
- Separate RT and IT traffic using VLANs
- Reduce send clock if network approaching capacity
-
Verify switch performance:
- Unmanaged switches may introduce excessive latency
- Switch buffer overflow causes frame loss
- Replace low-quality switches with industrial managed switches
- Enable QoS/prioritization for PROFINET traffic
-
Adjust timing parameters:
- Increase watchdog time to 3-4× update cycle
- Reduce communication frequency if real-time requirements allow
- For IRT: verify all switches support IRT and sync domain configured correctly
-
Check cable quality:
- Poor cable quality increases error rates and retransmissions
- Verify cable category meets requirements (Cat5e minimum, Cat6 recommended)
- Test cable signal quality using advanced diagnostics
- Replace marginal cables showing degraded performance
Slow Cycle Times and Performance Issues:
Symptoms: PLC scan time excessive, HMI updates slow, process control sluggish
Troubleshooting Steps:
-
Analyze communication load:
- Review "Statistics" in online diagnostics
- Check bytes/second transferred vs. network capacity
- Reduce unnecessary I/O data exchange
- Optimize device configurations to minimize data transfer
-
Optimize PROFINET configuration:
- Increase send clock for non-critical devices
- Use different update rates for different device groups
- Remove unused I/O modules from configuration
- Disable acyclic read/write if not required
-
Review PLC program efficiency:
- Excessive PLC scan time delays PROFINET communication
- Optimize PLC code execution time
- Move non-critical functions to cyclic interrupts
- Use appropriate OB organization (OB1 for cyclic, OB6x for timed interrupts)
Diagnostic Alarms and Maintenance Required:
Symptoms: Yellow device status, maintenance alarms appearing in diagnostic buffer
Common Maintenance Alarms:
- Supply voltage issues: Low voltage on 24VDC supply to I/O modules
- Temperature warnings: Device operating temperature approaching limits
- Communication quality degradation: Increasing error rates indicating cable/connector issues
- Preventive maintenance due: Device runtime hours exceed configured interval
Resolution:
- Review specific alarm details in diagnostic buffer
- Address root cause (correct voltage, improve cooling, replace cables)
- Acknowledge maintenance alarm after corrective action
- Configure alarm thresholds appropriate for application
PROFINET Diagnostics and Fault Localization
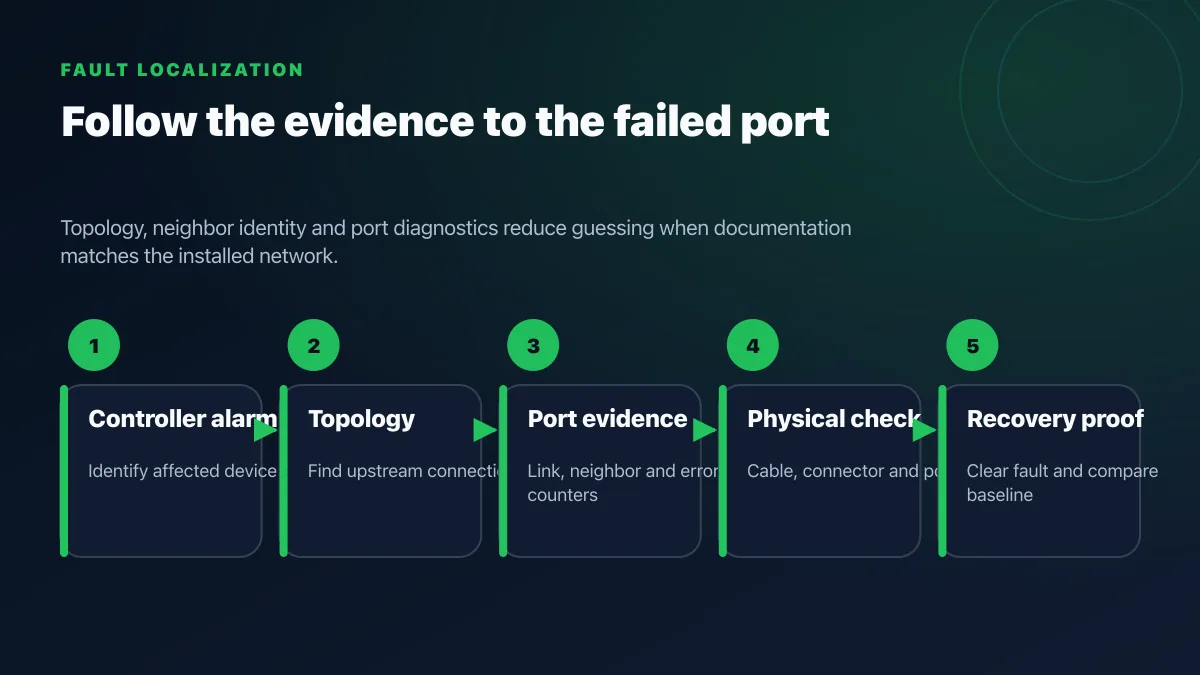
When a device goes red or gray in TIA Portal's diagnostics view, the fastest path to root cause is a three-level check: PLC diagnostic buffer → device alarm → physical layer.
Reading Alarms in TIA Portal
- Go online to the PLC (Online → Go online)
- Open Online & diagnostics → Diagnostics → Diagnostic buffer
- Look for the most recent fault entry — the buffer timestamps and describes every device alarm, communication timeout, and system event
- Double-click a buffer entry to jump to the affected device in the network view
- Select the device and open Online & diagnostics → Diagnostics to see the active alarm with module/channel detail
The color coding in the network view:
- Green — device operational, no faults
- Yellow — device running but maintenance required or configuration mismatch detected
- Red — device fault or communication error; cyclic data exchange stopped
- Gray — device is configured in the project but has not been found on the network at all
Using PRONETA for Network Analysis
PRONETA (free download from support.industry.siemens.com) is the fastest way to scan a network from a laptop without TIA Portal's full project loaded. Key uses:
- Network scan — discovers every PROFINET device by MAC address, name, IP, and device type; shows which devices have no name assigned
- Topology view — maps physical connections port-by-port using LLDP data; useful for verifying cable routes without the TIA Portal project
- Cable diagnostics — PRONETA can trigger a cable quality test on each port, reporting estimated cable length and signal quality
- Name assignment — you can assign or reset device names from PRONETA, useful during commissioning when TIA Portal is not available
- Network health report — exports a summary of all devices, their status, and any detected anomalies; useful for handover documentation
PRONETA does not require a TIA Portal license. Install it on any Windows laptop connected to the PROFINET subnet.
Common PROFINET Faults and Their Root Causes
| Fault symptom | Evidence to inspect | Safe next step |
|---|---|---|
| Configured device is absent | DCP discovery, device name, power, link, topology, controller buffer | Identify the physical device and compare its assigned name with the project |
| Identity is present but data exchange fails | IP/subnet, GSDML/firmware, slots/subslots, ownership, AR diagnostics | Correct the specific configured-versus-actual mismatch |
| Intermittent timeout | Port counters, cabling test, topology, controller/network load, update and watchdog settings | Capture the fault under load before changing timing or replacing hardware |
| Maintenance alarm | Exact channel/module alarm and manufacturer diagnostic | Correct the documented physical or process cause, then verify the alarm clears |
| IRT synchronization fails | Domain, controller/device/switch support, topology, schedule, clock diagnostics | Recalculate the supported IRT domain and retest the matched motion task |
PROFINET Network Analyzer Tools
PRONETA (PROFINET Network Analysis Tool):
Free diagnostic tool from Siemens providing:
- Network scanning: Discover all PROFINET devices on network
- Topology verification: Compare actual vs. expected network structure
- Cable testing: Identify cable faults and quality issues
- Performance analysis: Measure real-time traffic and identify bottlenecks
- Installation testing: Commission new networks with automated testing
Wireshark PROFINET Analysis:
For advanced protocol analysis:
- Install Wireshark with PROFINET dissectors
- Capture network traffic on PROFINET subnet
- Apply PROFINET display filters:
pn_rtorpn_io - Analyze frame timing, errors, and protocol compliance
- Identify unexpected traffic or protocol violations
Chapter 7: PROFINET Safety (PROFIsafe)
PROFIsafe Fundamentals
PROFIsafe enables safety-related communication over standard PROFINET networks, allowing safety PLCs, safety I/O, and safety devices to exchange fail-safe data without dedicated safety cabling. PROFIsafe achieves Safety Integrity Level (SIL) 3 per IEC 61508 and Performance Level (PL) e per ISO 13849 through safety protocol layer implemented above standard PROFINET communication.
PROFIsafe Safety Mechanisms:
- Unique identification: Safety addresses prevent message misrouting
- Data integrity: CRC checksums detect corrupted messages
- Sequence numbering: Detects lost, repeated, or inserted messages
- Timeout monitoring: Identifies communication failures
- Acknowledgment: Confirms safety data reception
PROFIsafe Device Types:
- F-CPU: Failsafe controllers (e.g., S7-1500F, ET 200SP CPU)
- F-Modules: Safety I/O modules for emergency stops, light curtains, safety gates
- F-Drives: Safety-integrated drives with Safe Torque Off (STO) and safe motion monitoring
- F-Devices: Safety sensors and actuators with integrated PROFIsafe communication
Configuring PROFIsafe in TIA Portal
Adding F-Devices to Safety Program:
-
Configure standard PROFINET communication for F-Device
-
Compile safety program in TIA Portal Safety Advanced
-
Assign F-parameters to safety modules:
- F-Destination address (unique safety address)
- F-Source address (safety controller address)
- F-Watchdog time (safety communication timeout)
- F-CRC length (data integrity checking strength)
-
Program safety logic using F-capable function blocks
-
Compile safety program with separate safety compilation
-
Download safety program with password protection
Safety Communication Parameters:
- F-Watchdog or monitoring time: Set from the validated safety response-time calculation and supported device range
- F-Monitoring Time: Device-specific safety timeout configuration
- iPar Server: Parameter server for consistent F-parameter management
Chapter 8: Advanced PROFINET Features
Media Redundancy Protocol (MRP)
MRP Configuration:
Media Redundancy Protocol provides network availability through automatic failover to redundant communication paths:
Setting Up MRP Ring:
-
Design ring topology connecting devices in closed loop
-
Configure controller as MRP manager:
- Select CPU → "Properties" → "PROFINET interface" → "Media redundancy"
- Enable "MRP" option
- Select "Manager" role
- Configure first and second ring ports
-
Configure IO-Devices as MRP clients:
- Select each device → "PROFINET interface" → "Media redundancy"
- Enable "MRP" option
- Select "Client" role
- Configure the ports designated by that device's MRP manual
-
Verify MRP operation:
- Monitor MRP status in online diagnostics
- Test failover by disconnecting single cable
- Measure fault detection and recovery against the process acceptance limit
- Restore cable and confirm ring operation resumes
MRP topology checks:
- Every participant and port supports the selected MRP role and mode
- The manager/client roles and ring closure match the engineered topology
- Device-count and recovery limits come from the current controller and participant manuals
- The process tolerates the measured interruption and does not depend on MRP for controller, device, or power redundancy
LLDP (Link Layer Discovery Protocol)
LLDP enables automatic network topology discovery, showing how devices are physically interconnected:
Enabling LLDP:
- Configure each device → "PROFINET interface" → "LLDP"
- Enable "Generate LLDP telegrams" option
- Configure transmission interval (default 5 seconds suitable for most applications)
Using Topology View:
- Online diagnostics displays discovered topology
- Identify incorrect cabling (topology mismatch)
- Verify network structure matches design
- Simplify troubleshooting with visual network representation
DCP (Discovery and Configuration Protocol)
DCP enables PROFINET device identification and configuration without requiring pre-assigned IP addresses:
DCP Functions:
- Device discovery: Locate PROFINET devices on network by MAC address
- Name assignment: Assign PROFINET device names permanently
- IP configuration: Set IP addresses remotely
- Factory reset: Reset devices to default configuration
Using DCP for Commissioning:
- Connect new device to network (no configuration required)
- Use TIA Portal "Assign device name" function
- Scan network to detect unassigned devices
- Match device by MAC address or temporary identification (LED blinking)
- Assign configured device name and IP address
- Device stores configuration permanently in non-volatile memory
Shared Device Functionality
Shared Device enables multiple IO-Controllers to access different modules within a single IO-Device:
Use Cases:
- Separate safety and standard controllers accessing shared I/O stations
- Multiple production line controllers sharing common I/O areas
- Redundant controller systems with distributed access
Configuration Requirements:
- Define which modules/slots assigned to which controllers
- Configure inter-controller communication for data exchange
- Coordinate startup and shutdown sequences
- Ensure only one controller writes to each output module
Chapter 9: PROFINET Best Practices
Network Design Recommendations
Performance Optimization:
- Segment networks logically: Separate IRT, RT, and IT traffic using VLANs or physical segmentation
- Minimize network diameter: Reduce number of switch hops between controller and devices
- Use quality switches: Industrial managed switches with QoS and VLAN support
- Optimize send clocks: Match communication frequency to application requirements
- Reduce data volume: Configure only required I/O, disable unused diagnostics
Reliability Improvements:
- Implement MRP for critical systems: Ring topology with redundant paths
- Use industrial components: Rated for temperature, vibration, and EMI
- Enable comprehensive diagnostics: Detect issues before failures occur
- Plan spare capacity: Leave bandwidth and device address space for expansion
- Document thoroughly: Maintain accurate network diagrams and configurations
Installation and Commissioning Tips
Pre-Installation Planning:
- Create detailed network diagrams showing all devices and connections
- Plan IP address scheme systematically
- Define naming conventions for consistent device identification
- Select appropriate switches for topology and performance requirements
- Procure high-quality cables, connectors, and installation materials
Installation Best Practices:
- Label all cables at both ends with source/destination information
- Test each cable segment before connecting devices
- Install switches in accessible locations for maintenance
- Provide adequate cooling for enclosed switch installations
- Document as-built configuration including cable routes and connection details
Commissioning Procedure:
- Power network infrastructure without connecting devices
- Verify switch configuration and network connectivity
- Connect and configure one device at a time
- Test communication before adding next device
- Document any configuration changes during commissioning
- Perform final system test with all devices operational
- Create baseline performance measurements for future comparison
Maintenance and Lifecycle Management
Preventive Maintenance:
- Monitor diagnostic buffers for recurring issues
- Review cable test results annually
- Update firmware to current versions
- Test backup communication paths periodically (MRP failover)
- Maintain spare devices and cables for quick replacement
Firmware Management:
- Track firmware versions for all PROFINET devices
- Test firmware updates in non-production environment
- Follow vendor recommendations for compatibility
- Maintain rollback capability if updates cause issues
- Document firmware update procedures
Configuration Management:
- Backup TIA Portal projects after any configuration changes
- Version control project files with meaningful descriptions
- Store backup copies offsite or in cloud storage
- Test restore procedures periodically
- Document configuration baseline for each system
Frequently Asked Questions (FAQ)
What is the difference between PROFINET RT and IRT?
How many devices can connect to a PROFINET network?
Can I use regular Ethernet switches for PROFINET?
What cable type is required for PROFINET networks?
How do I assign a PROFINET device name in TIA Portal?
What is the maximum cable length for PROFINET networks?
How does PROFINET compare to PROFIBUS?
Can PROFINET and standard Ethernet traffic share the same network?
What is Media Redundancy Protocol (MRP) in PROFINET?
How do I troubleshoot PROFINET communication errors?
What is PROFIsafe and how does it work?
Can I connect third-party devices to Siemens PROFINET networks?
Primary sources and review basis
- PI PROFINET technology and application system description — roles, communication classes, engineering, and diagnostics.
- Siemens: PROFINET with STEP 7 function manual — TIA Portal workflow and Siemens-specific configuration context.
- PI PROFINET installation guidance — cabling, installation, and commissioning resources.
- PI PROFIsafe technology — black-channel safety profile scope.
Menu labels and supported settings vary by TIA Portal release, controller, firmware, GSDML, and device. The manufacturer manual and safety documentation remain authoritative for the selected component. This tutorial was technically reviewed on 2026-07-25.
Conclusion: Implementing PROFINET Successfully
PROFINET combines cyclic industrial communication, device engineering and diagnostics on Ethernet infrastructure. A reliable deployment comes from matching identities and modules, calculating the configured load, testing loss and recovery, and retaining reproducible commissioning evidence.
Understanding the fundamental differences between RT and IRT communication types enables you to select appropriate PROFINET variants matching your application requirements—RT for standard I/O and process automation, IRT for demanding motion control. Proper network architecture design considering topology, segmentation, and switch selection ensures optimal performance, reliability, and troubleshooting efficiency throughout the system lifecycle.
The workflow above provides a reproducible starting point from project configuration through device commissioning. Exact menus, blocks, parameters, and address mapping must be adapted to the selected TIA Portal release, controller, and IO-Device documentation.
Configure diagnostics and topology evidence before faults occur. Evaluate MRP only where a supported ring addresses an identified link-failure requirement, and evaluate PROFIsafe only inside the complete certified safety design.
Continue expanding your PROFINET knowledge with TIA Portal programming, Siemens PLC programming, industrial communication protocols, and the requirements-based managed vs unmanaged industrial-switch selector.
Apply the workflow in an isolated lab or approved commissioning window before production. Retain the GSDML, versions, topology, timing configuration, healthy baseline, injected-fault results, recovery evidence, and restore procedure with the project archive.