GE/Emerson PACSystems PLC Programming Tutorial
Program an Emerson PACSystems project in PAC Machine Edition with current naming, a tested control example, migration checks and official product sources.
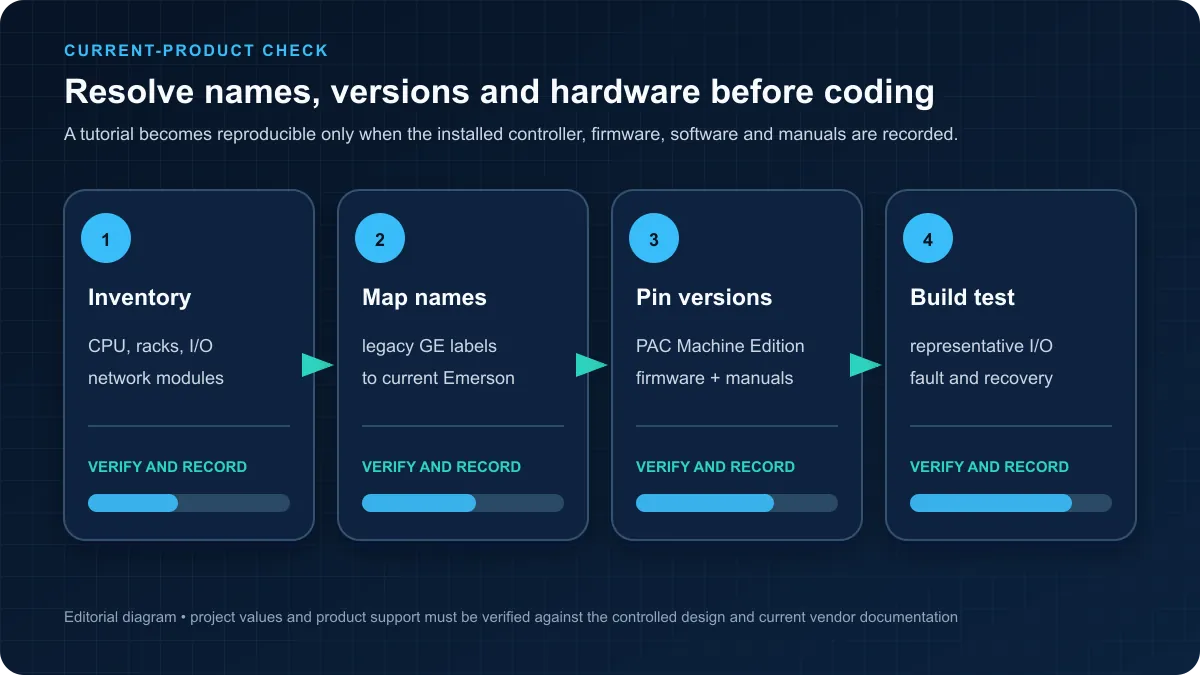
PACSystems controllers are now an Emerson product line, although installed projects and searches still use GE, GE Fanuc, RX3i and Proficy names. For a current project, first record the exact controller SKU, lifecycle status, firmware and PAC Machine Edition version; then build, validate, store, run and fault-test one small project before translating a legacy application.
Emerson announced the GE Intelligent Platforms acquisition in 2018 and identifies it as acquired in 2019. Do not confuse that transaction with Emerson's separate 2023 NI acquisition. In 2026, Emerson's current naming maps RX3i to the PACSystems 300-Series and CPE400/CPL410/CPS400 to the 400-Series; older names remain important for installed-base documentation.
Reproducible first-project test matrix
| Test | Action | Evidence to save |
|---|---|---|
| Version baseline | Record controller SKU/firmware and PME build | Screenshot/export plus project manifest |
| Validate | Build a minimal project | Zero-error validation log |
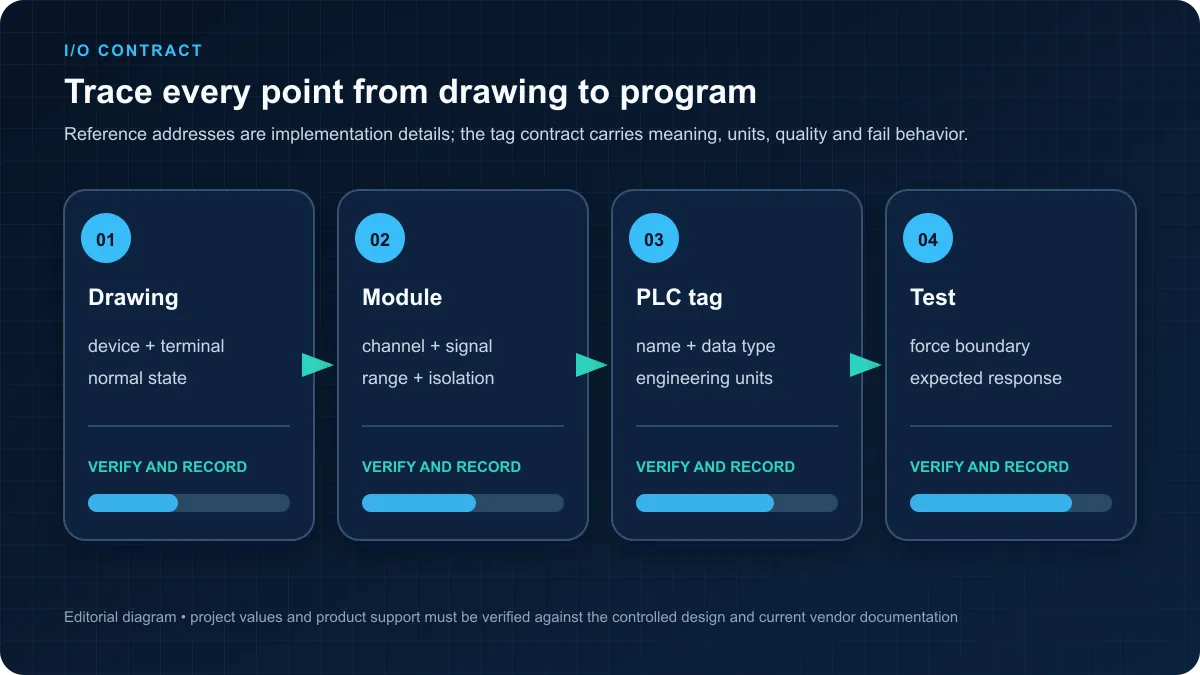
| I/O map | Toggle isolated test inputs | Address-to-tag results and polarity |
| Store/run | Store to approved test controller and enter RUN | Controller state and equality result |
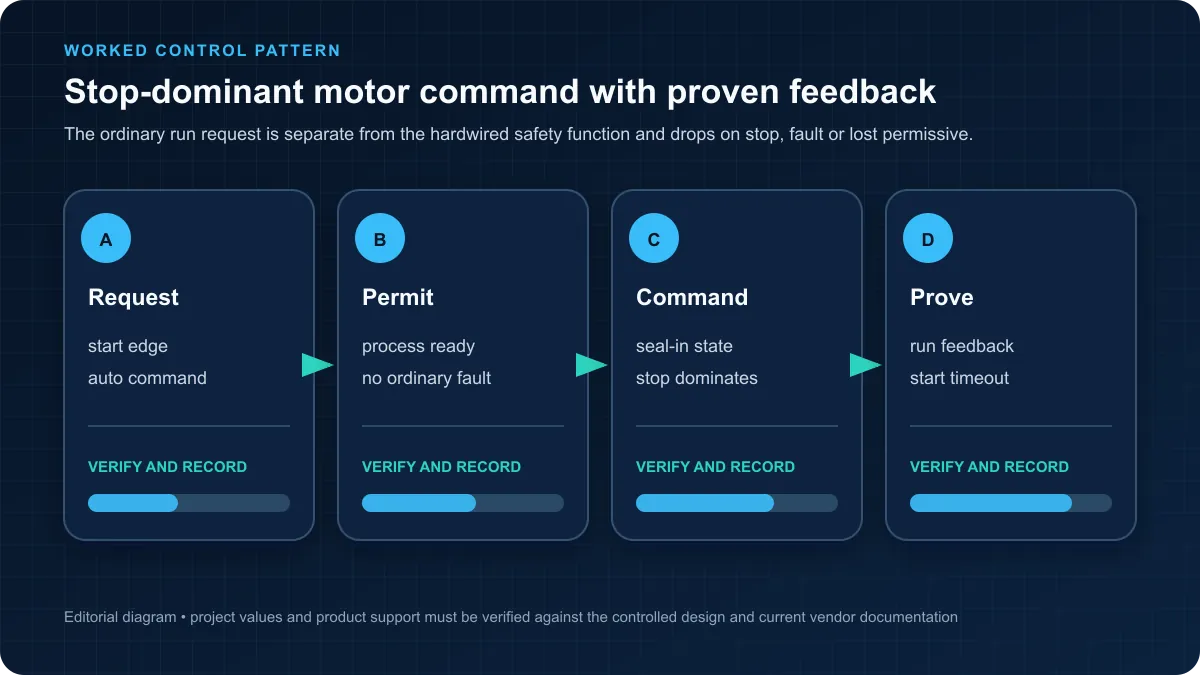
| Stop dominance | Assert Stop and Start together | Output remains off |
| Feedback failure | Command output without simulated feedback | Timeout and diagnostic latch |
| CPU STOP/RUN | Change mode on isolated hardware | Output and restart-required state |
| Power recovery | Controlled restart | No unintended process command |
| Backup/restore | Restore to spare/emulator where supported | Equality and regression-test results |
Practice the stop-dominant sequence before mapping PACSystems I/O. The browser simulator does not emulate PACSystems firmware, EGD timing, hardware redundancy or safety certification.
This guide covers current naming, PAC Machine Edition workflow, ladder and structured-text patterns, communications, migration checks and commissioning evidence. Treat every menu path and instruction detail as version-specific and verify it in the installed help/manual.

Table of Contents
- GE PACSystems Product Lines Overview
- Proficy Machine Edition Software
- Ladder Logic Programming
- Structured Text Programming
- Function Block Diagram Programming
- Communication and Networking
- Practical Application: Water Treatment Plant
- RX7i Redundancy and Hot Standby
- Best Practices for GE PACSystems
- Troubleshooting Common Issues
- Frequently Asked Questions
GE PACSystems Product Lines Overview
Emerson's current portfolio page groups PACSystems controllers into 200-, 300- and 400-Series families. Older installed-base terms still appear in projects, drawings and spare-parts searches.
| Current name | Legacy/search name | Architecture cue | Verify before selection |
|---|---|---|---|
| PACSystems 200-Series | RSTi-EP controller family | Compact/modular control | Exact memory, ports, protocols, local/remote I/O and lifecycle |
| PACSystems 300-Series | RX3i | Rack-based modular PAC | CPU-specific performance, redundancy options, module compatibility and firmware |
| PACSystems 400-Series | CPE400, CPL410, CPS400 Safety PLC | Rackless control with edge-capable variants | Safety versus standard SKU, Linux/PACEdge scope, I/O architecture and certificates |
| VersaMax modular I/O | VersaMax | Installed-base I/O | Emerson's naming notice says availability is limited to existing users; confirm lifecycle and migration path |
Do not use the obsolete price, processor-speed or “maximum I/O” tables that previously appeared here. Quotations, licenses and capabilities change, and controller scan performance depends on the actual program and communications load.
Exact-part-number selection checklist
- Export the installed hardware configuration and firmware from the existing project, if one exists.
- Check every SKU in Emerson's current lifecycle and compatibility resources.
- List required local/remote I/O, protocols, time synchronisation, redundancy, cybersecurity and environmental ratings.
- Confirm PAC Machine Edition supports the selected controller and firmware.
- Benchmark the representative program, communications and diagnostics on the proposed hardware.
- Run controller, network, I/O and power fault tests; redundancy does not cover every failure mode.
- Capture vendor quotations separately rather than publishing stale prices in a technical guide.
Proficy Machine Edition Software
Emerson calls the current engineering software PAC Machine Edition; older projects and searches commonly use Proficy Machine Edition (PME). Emerson announced PAC Machine Edition 10.7 in November 2025. Match the software build to the target controller, firmware and installed option licenses.
Installation and Licensing
Software Installation Process:
-
Compatibility check:
- Read the release notes for supported Windows builds, controller firmware and coexistence restrictions
- Record the installer version, checksum and entitlement source
- Back up existing projects and license activation information
-
Download and installation:
- Obtain PAC Machine Edition through Emerson's authorised channel
- Run installer with administrative privileges
- Select installation components (programming environment, emulator, documentation)
- Configure installation directory and shortcuts
- Complete installation and restart computer
License editions and activation methods change. Confirm the exact entitlement required for controller programming, optional capabilities and multi-user use with Emerson or an authorised distributor before deployment.
Project Creation and Organization
Creating New PACSystems Project:
- Launch Proficy Machine Edition
- Select "File" → "New" → "Project"
- Choose the target matching the exact controller SKU (legacy names may still appear in the catalog)
- Select specific CPU model from catalog (e.g., IC695CPE310)
- Configure project name and storage location
- Set default programming language
- Initialize project structure
Project Organization Structure:
Project Root
├── Hardware Configuration
│   ├── CPU Configuration
│   ├── I/O Module Configuration
│   ├── Network Configuration
│   └── Device Addresses
├── Program Organization Units (POUs)
│   ├── Main Program (_MAIN)
│   ├── Functions (FUN)
│   ├── Function Blocks (FB)
│   └── Programs (PRG)
├── Variables
│   ├── Global Variables
│   ├── I/O Variables (%I, %Q)
│   └── Memory Variables (%M, %R)
├── Data Types
│   ├── Structures
│   ├── Enumerations
│   └── Arrays
└── Documentation
    ├── Variable Comments
    ├── Ladder Rung Comments
    └── Function Block Descriptions
Hardware Configuration Tool
Configuring RX3i Hardware:
-
CPU Configuration:
- Select CPU model from module catalog
- Configure Ethernet IP addresses (Port 1, Port 2)
- Set scan rate and watchdog timer
- Enable/disable features (Web server, SNMP, time sync)
- Configure security settings
-
I/O Module Addition:
- Drag modules from catalog to backplane
- Configure module parameters (voltage range, filter time, alarms)
- Assign reference addresses (%I, %Q addresses)
- Set module diagnostics and fault handling
- Configure special module features
-
Network Configuration:
- Configure Ethernet Global Data (EGD) exchanges
- Set up Modbus TCP/RTU communication
- Configure PROFINET IO devices
- Configure EtherNet/IP adapters
- Establish OPC UA server connections
Hardware Configuration Example (Water Treatment Station):
Slot 0: IC695CPE310 CPU
  - IP Address: 192.168.1.100
  - Subnet Mask: 255.255.255.0
  - Gateway: 192.168.1.1
  - Scan Rate: 10 ms

Slot 1: IC695MDL740 - 32-point 24VDC Input Module
  - Reference: %I00001 - %I00032
  - Filter Time: 3 ms
  - Diagnostics: Enabled

Slot 2: IC695MDL940 - 32-point 24VDC Output Module
  - Reference: %Q00001 - %Q00032
  - Fault Mode: Hold last state
  - Diagnostics: Enabled

Slot 3: IC695ALG600 - 8-channel Analog Input
  - Reference: %AI00001 - %AI00008
  - Input Type: 4-20mA
  - Scaling: 0-32767 counts
  - Diagnostics: Enabled
Programming Interface Overview
Proficy Machine Edition Programming Workspace:
The PME interface provides integrated access to all programming tools, hardware configuration, online debugging, and documentation features through tabbed workspace organization.
Key Interface Components:
- Navigator Pane: Project tree showing hardware, programs, variables, data types
- Editor Pane: Active programming editor (ladder, FBD, ST, IL, SFC)
- Variable Table: Quick access to I/O, memory, and global variables
- Output Window: Compiler messages, search results, reference information
- Reference Data Window: Cross-reference, unused variables, program statistics
- Toolbar: Quick access to common operations (compile, download, online mode)
Programming Language Selection:
Each Program Organization Unit (POU) can use different programming languages selected independently, allowing optimal language choice for each control function:
- Ladder Diagram (LD): Boolean logic, interlocks, sequential control
- Function Block Diagram (FBD): Process control, analog calculations, PID loops
- Structured Text (ST): Complex algorithms, mathematical calculations, data manipulation
- Instruction List (IL): Low-level programming, optimization, legacy code
- Sequential Function Chart (SFC): Batch processes, state machines, sequential operations
Emulator for Testing
PACSystems RX3i Emulator:
Proficy Machine Edition includes integrated emulator capability enabling program testing without physical hardware, accelerating development and reducing commissioning time.
Emulator Features:
- Full CPU instruction set emulation
- I/O forcing and simulation
- Communication protocol testing
- HMI integration testing
- Program debugging and single-stepping
- Variable monitoring and trending
Using the Emulator:
- Create project with target CPU configuration
- Develop program logic and variable declarations
- Select "Target" → "Set PLC Mode" → "Run Emulator"
- Download program to emulator instance
- Force I/O variables to simulate field conditions
- Monitor program execution and verify logic
- Debug and refine program before hardware deployment
Emulator Limitations:
- Does not simulate exact scan timing
- Cannot test hardware-specific features
- Communication protocols operate in loopback mode
- Performance differs from actual CPU
- Advanced features may not fully emulate
Ladder Logic Programming
GE PACSystems ladder logic programming follows IEC 61131-3 standards with GE-specific instruction extensions providing powerful control capabilities for process automation, power systems, and infrastructure applications.
Basic Ladder Logic Instructions
Contact and Coil Instructions:
|--[ ]-----|  Normal Open Contact (%I, %M, %T, %G)
|--[/]-----|  Normal Closed Contact
|--( )-----|  Normal Coil (%Q, %M, %G)
|--( / )---|  Negated Coil
|--( S )---|  Set Coil (remains ON until reset)
|--( R )---|  Reset Coil (turns OFF)
Run this in the simulator — no signup
Boolean Instructions:
AND:  Series contacts (both must be TRUE)
OR:   Parallel contacts (either can be TRUE)
XOR:  Exclusive OR (exactly one TRUE)
NOT:  Negation (inverts state)
Example: Basic Start/Stop Circuit with Indicator:
|                                                                  |
|  Start_PB     Stop_PB      Run_Status          Run_Relay        |
|----] [----------]/[-----------] [----------------( )------------|
|                              |                                   |
|                              |                                   |
|  Run_Relay                   |                                   |
|----] [----------------------|                                   |
|                                                                  |
|  Run_Relay                                     Run_Indicator    |
|----] [----------------------------------------------( )---------|
|                                                                  |

Variable Declarations:
%I00001  Start_PB       "Start Pushbutton"
%I00002  Stop_PB        "Stop Pushbutton"
%M00001  Run_Status     "Internal Run Status"
%Q00001  Run_Relay      "Run Relay Output"
%Q00002  Run_Indicator  "Run Indicator Light"
Run this in the simulator — no signup
Timer Instructions
GE PACSystems provides comprehensive timer instructions compatible with both millisecond and 10-millisecond time bases depending on CPU configuration.
TON - On-Delay Timer:
Turns ON after preset time delay expires while enable input remains TRUE.
    Enable                              TON_Instance
  ----] [----------------------------------|TON     |
                                      PT--|        |--Q---- TimerDone
                                          | Timer  |
                                          |________|--ET--- ElapsedTime

Parameters:
- Enable (BOOL): Timer enable input
- PT (TIME): Preset time value
- Q (BOOL): Timer done output (ON when ET >= PT)
- ET (TIME): Current elapsed time
TOFF - Off-Delay Timer:
Turns OFF after preset time delay expires after enable input goes FALSE.
    Enable                             TOFF_Instance
  ----] [----------------------------------|TOFF    |
                                      PT--|        |--Q---- TimerDone
                                          | Timer  |
                                          |________|--ET--- ElapsedTime
TRTG - Retentive Timer:
Accumulates time across multiple enable periods, continues counting where it left off.
    Enable                             TRTG_Instance
  ----] [----------------------------------|TRTG    |
    Reset                             PT--|        |--Q---- TimerDone
  ----] [----------------------------------|        |
                                          |________|--ET--- ElapsedTime
Practical Timer Example - Pump Delay Start:
|                                                                  |
|  Pump_Start     Pump_Running                    Delay_Timer     |
|----] [-------------]/[---------------------------|TON     |      |
|                                             PT-T#5s|      |      |
|                                                   |______|      |
|                                                        |Q        |
|  Delay_Timer.Q                                   Pump_Starter   |
|----] [-------------------------------------------( )------------|
|                                                                  |

Application: 5-second delay before starting pump motor to allow
valve positioning or pressure stabilization. Prevents mechanical
stress and extends equipment life in water treatment applications.
Run this in the simulator — no signup
Counter Instructions
CTU - Count Up Counter:
Increments count value on rising edge of count input until preset value reached.
    Count_Input                        CTU_Instance
  ----] [----------------------------------|CTU     |
    Reset                              PV--|        |--Q---- CountDone
  ----] [----------------------------------|        |
                                          |________|--CV--- CurrentValue
CTD - Count Down Counter:
Decrements count value on rising edge of count input until zero reached.
    Count_Input                        CTD_Instance
  ----] [----------------------------------|CTD     |
    Load                               PV--|        |--Q---- CountZero
  ----] [----------------------------------|        |
                                          |________|--CV--- CurrentValue
Practical Counter Example - Production Counting:
|                                                                  |
|  Part_Sensor     Counter_Reset               Production_Counter |
|----] P [-------------] [----------------------|CTU     |         |
|                                          PV-1000|      |         |
|  Counter_Reset                                 |______|         |
|----] [----------------------------------------|                 |
|                                                    |Q            |
|                                                                  |
|  Production_Counter.Q                         Batch_Complete    |
|----] [-----------------------------------------( )--------------|
|                                                                  |
|  Production_Counter.Q                                           |
|----] [------------------------------------------(R)-------------|
|                                                Production_Counter|
|                                                                  |

Application: Counts parts in packaging application, signals batch
completion at 1,000 parts, automatically resets for next batch.
Used in food processing, pharmaceutical, and manufacturing lines.
Run this in the simulator — no signup
Memory Organization and Addressing
GE PACSystems Memory Structure:
%I - Physical Input References
%Q - Physical Output References
%M - Internal Memory (Boolean)
%T - Temporary Memory (Boolean, scan-based)
%S - System Status Bits
%AI - Analog Input References
%AQ - Analog Output References
%R - Register Memory (16-bit integers)
%W - Word Memory (16-bit)
%L - Long Memory (32-bit)
%G - Global Memory (networked between controllers)
Reference Addressing Examples:
%I00001        Discrete input point 1
%I00015        Discrete input point 15
%Q00032        Discrete output point 32
%M00001        Internal memory bit 1
%AI00001       Analog input channel 1 (16-bit value)
%AQ00005       Analog output channel 5 (16-bit value)
%R00100        Register memory word 100
%G00001        Global memory bit 1 (EGD exchange)
Data Type Support:
- BOOL: Single bit (TRUE/FALSE)
- INT: 16-bit signed integer (-32,768 to 32,767)
- DINT: 32-bit signed integer (-2,147,483,648 to 2,147,483,647)
- REAL: 32-bit floating point
- STRING: Character strings
- ARRAY: Multiple elements of same type
- STRUCTURE: User-defined complex data types
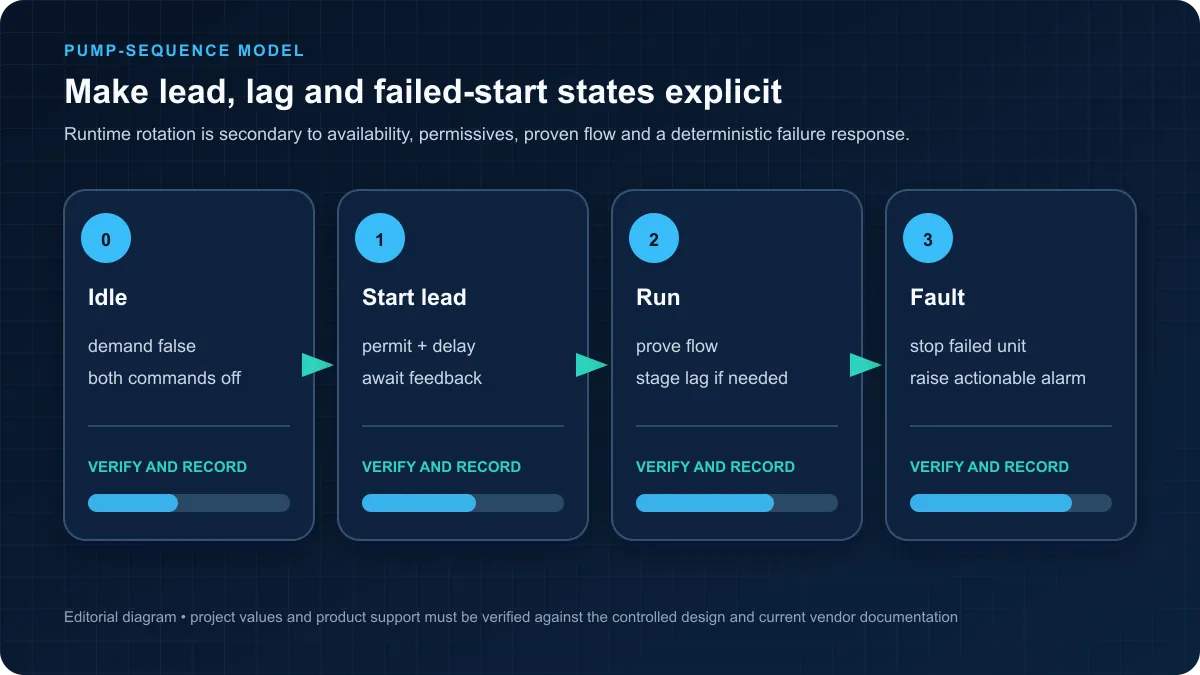
Complete Ladder Logic Example - Pump Alternation Control
|═════════════════════════════════════════════════════════════════|
|  Pump Alternation System - Water Treatment Application          |
|  Alternates lead pump each cycle to equalize runtime            |
|═════════════════════════════════════════════════════════════════|
|                                                                  |
|  Auto_Mode    Tank_Low_Level    Pump1_Fault     Pump1_Enable   |
|----] [------------] [---------------]/[------------( )----------|
|                                                                  |
|  Pump1_Enable   Lead_Select                                     |
|----] [-----------] [-------------------------------------       |
|                                                         |        |
|  Pump1_Enable   Lead_Select                            |        |
|----] [----------]/[-------------------------------------|        |
|                                                                  |
|  Pump1_Enable   Start_Delay                         Pump1_Run   |
|----] [------------] [---------------------------------( )-------|
|                                                                  |
|  Auto_Mode    Tank_Low_Level    Pump2_Fault     Pump2_Enable   |
|----] [------------] [---------------]/[------------( )----------|
|                                                                  |
|  Pump2_Enable   Lead_Select                                     |
|----] [----------]/[-------------------------------------        |
|                                                         |        |
|  Pump2_Enable   Lead_Select                            |        |
|----] [-----------] [-------------------------------------|       |
|                                                                  |
|  Pump2_Enable   Start_Delay                         Pump2_Run   |
|----] [------------] [---------------------------------( )-------|
|                                                                  |
|  Pump1_Run    Pump2_Run                                         |
|----] [----------] [------------------------(R)------------------|
|                                         Tank_Low_Level           |
|                                                                  |
|  Pump1_Run                                                      |
|----]/[------------------------------------------------          |
|                 |                                     |          |
|  Pump2_Run      |                                    |          |
|----]/[----------|                                    |          |
|                                                      |          |
|  Pump1_Run      Pump2_Run                           |          |
|----] [------------] [--------------------------------|          |
|                                                                  |
|  Lead_Select                                     Lead_Toggle    |
|----]/[-------------------------------------------------( )-----|
|                                                                  |
|  Lead_Toggle                                                    |
|----] P [-------------------------------------------(S)----------|
|                                                Lead_Select       |
|                                                                  |
|  Lead_Select    Alternate_Delay                                |
|----] [------------] [-----------------------------|TON    |     |
|                                              PT-T#10s|    |     |
|                                                     |_____|     |
|                                                          |Q     |
|  Alternate_Delay.Q                                              |
|----] [------------------------------------------------(R)------|
|                                               Lead_Select        |
|                                                                  |

Variable Declarations:
%I00001  Auto_Mode         "Automatic mode selector"
%I00002  Tank_Low_Level    "Tank low level float switch"
%I00003  Pump1_Fault       "Pump 1 fault status"
%I00004  Pump2_Fault       "Pump 2 fault status"

%M00001  Pump1_Enable      "Pump 1 enable logic"
%M00002  Pump2_Enable      "Pump 2 enable logic"
%M00003  Lead_Select       "Lead pump selector (0=Pump1, 1=Pump2)"
%M00004  Start_Delay       "Startup delay complete"
%M00005  Lead_Toggle       "Toggle lead pump trigger"

%Q00001  Pump1_Run         "Pump 1 starter output"
%Q00002  Pump2_Run         "Pump 2 starter output"

Application: Municipal water system high-service pumping station
with two 100 HP pumps. System alternates lead pump each cycle to
equalize runtime and maintenance intervals. Lag pump remains off
unless additional capacity needed (expandable for lag operation).
Run this in the simulator — no signup
Live mini-lab
Try it: press START, then STOP
A stop-dominant seal-in rung: START latches the motor output through its own contact, and STOP breaks the circuit.
Watch the output lamp: it stays on after START until you press STOP.
Free · no signup to try · runs in your browserOpens plcsimulationsoftware.com — same team
Structured Text Programming
Structured Text (ST) provides high-level programming capabilities ideal for complex calculations, data manipulation, and algorithms that are cumbersome in ladder logic. GE PACSystems ST implementation follows IEC 61131-3 standards with additional vendor extensions.
When to Use Structured Text vs Ladder Logic
Use Structured Text For:
- Mathematical calculations and formula-based control
- Complex conditional logic with multiple IF-THEN-ELSE branches
- Data manipulation and array processing
- String handling and parsing operations
- Algorithm implementation (PID control, statistical analysis)
- Communication protocol handling
Use Ladder Logic For:
- Boolean interlocks and safety logic
- Sequential control and state machines
- Motor control and discrete device control
- Operator interface and pushbutton logic
- Traditional relay replacement applications
Structured Text Syntax Fundamentals
Basic ST Program Structure:
PROGRAM PID_Temperature_Control
VAR
    (* Input Variables *)
    Process_Temperature : REAL;  (* Current temperature from sensor *)
    Setpoint : REAL;             (* Desired temperature *)
    Manual_Mode : BOOL;          (* Manual/Auto mode selector *)
    Manual_Output : REAL;        (* Manual output value 0-100% *)

    (* Control Parameters *)
    Kp : REAL := 2.0;           (* Proportional gain *)
    Ki : REAL := 0.5;           (* Integral gain *)
    Kd : REAL := 0.1;           (* Derivative gain *)

    (* Internal Variables *)
    Error : REAL;                (* Control error *)
    Integral : REAL := 0.0;     (* Integral accumulator *)
    Last_Error : REAL := 0.0;   (* Previous error for derivative *)
    Derivative : REAL;           (* Error rate of change *)

    (* Output Variables *)
    Control_Output : REAL;       (* Final control output 0-100% *)
END_VAR

(* PID Control Algorithm *)
IF NOT Manual_Mode THEN
    (* Calculate error *)
    Error := Setpoint - Process_Temperature;

    (* Proportional term *)
    Control_Output := Kp * Error;

    (* Integral term with anti-windup *)
    Integral := Integral + (Ki * Error);
    IF Integral > 100.0 THEN
        Integral := 100.0;
    ELSIF Integral < 0.0 THEN
        Integral := 0.0;
    END_IF;
    Control_Output := Control_Output + Integral;

    (* Derivative term *)
    Derivative := Kd * (Error - Last_Error);
    Control_Output := Control_Output + Derivative;

    (* Clamp output to 0-100% *)
    IF Control_Output > 100.0 THEN
        Control_Output := 100.0;
    ELSIF Control_Output < 0.0 THEN
        Control_Output := 0.0;
    END_IF;

    (* Save error for next scan *)
    Last_Error := Error;
ELSE
    (* Manual mode - use manual output value *)
    Control_Output := Manual_Output;

    (* Track setpoint in manual mode for bumpless transfer *)
    Integral := Manual_Output - (Kp * Error);
    Last_Error := Error;
END_IF;

END_PROGRAM
Run Structured Text in the simulator
ST Control Flow Statements:
(* IF-THEN-ELSE Conditional *)
IF Temperature > High_Limit THEN
    Heater_Enable := FALSE;
    Alarm_Active := TRUE;
ELSIF Temperature < Low_Limit THEN
    Heater_Enable := TRUE;
    Alarm_Active := FALSE;
ELSE
    Heater_Enable := TRUE;
    Alarm_Active := FALSE;
END_IF;

(* CASE Statement for Multi-Way Selection *)
CASE Machine_State OF
    0:  (* Idle state *)
        Motor_Run := FALSE;
        Ready_Indicator := TRUE;

    1:  (* Running state *)
        Motor_Run := TRUE;
        Ready_Indicator := FALSE;

    2:  (* Stopping state *)
        Motor_Run := FALSE;
        Ready_Indicator := FALSE;

    ELSE
        (* Default/fault state *)
        Motor_Run := FALSE;
        Alarm_Active := TRUE;
END_CASE;

(* FOR Loop for Array Processing *)
FOR i := 1 TO 10 DO
    Sensor_Average := Sensor_Average + Sensor_Array[i];
END_FOR;
Sensor_Average := Sensor_Average / 10.0;

(* WHILE Loop with Condition *)
WHILE Tank_Level < Target_Level AND Fill_Time < Max_Fill_Time DO
    Fill_Valve := TRUE;
    Fill_Time := Fill_Time + 1;
END_WHILE;

(* REPEAT-UNTIL Loop *)
REPEAT
    Read_Sensor();
    Sample_Count := Sample_Count + 1;
UNTIL Sample_Count >= Required_Samples
END_REPEAT;
Run Structured Text in the simulator
Practical ST Example - Chemical Dosing Calculation
This example demonstrates command validation, not a real chemical formula. Supply ReviewedDemand from a separately reviewed process calculation with tested units and approved limits.
FUNCTION_BLOCK Validated_Feed_Command
VAR_INPUT
    ReviewedDemand : REAL;
    AutoEnable : BOOL;
    FlowValid : BOOL;
    AnalyzerValid : BOOL;
    EquipmentReady : BOOL;
    IndependentHighLimit : BOOL;
    ApprovedLow : REAL;
    ApprovedHigh : REAL;
    SafeOutput : REAL;
END_VAR

VAR_OUTPUT
    FeedEnable : BOOL;
    FeedCommand : REAL;
    FeedFault : BOOL;
END_VAR

FeedFault := NOT FlowValid
             OR NOT AnalyzerValid
             OR NOT EquipmentReady
             OR IndependentHighLimit
             OR (ReviewedDemand < ApprovedLow)
             OR (ReviewedDemand > ApprovedHigh);

FeedEnable := AutoEnable AND NOT FeedFault;
FeedCommand := SEL(FeedEnable, SafeOutput, ReviewedDemand);
END_FUNCTION_BLOCK
Run Structured Text in the simulator
Test low/no flow, stale analyzer, out-of-range demand, equipment not ready, high-limit trip, controller restart and manual/auto transfer. The page's water-treatment guide covers the process-safety boundary in more detail.
Function Block Diagram Programming
Function Block Diagram (FBD) provides graphical programming using interconnected function blocks, ideal for process control, analog signal processing, and continuous control applications common in power and process industries.
FBD Programming Methodology
Function Block Diagram Advantages:
- Visual representation of signal flow and data processing
- Natural fit for analog control and process applications
- Reusable function blocks encapsulate complex functionality
- Easy integration of standard control algorithms (PID, scaling, filtering)
- Intuitive for engineers familiar with process control diagrams
Basic FBD Elements:
Input Variables → [Function Block] → Output Variables
                       ↓
                  Internal State
Standard Function Blocks in PACSystems
Analog Scaling Block:
Raw_Input (INT)  →  |              |  → Scaled_Output (REAL)
Input_Min (INT)  →  |   SCALE      |
Input_Max (INT)  →  |   Function   |
Output_Min (REAL) → |              |
Output_Max (REAL) → |______________|
Example FBD Implementation - Temperature Scaling:
%AI00001     →  |                |  → Process_Temp
(4-20mA)        |  Input: 6242   |     (Scaled 32-250°F)
                |  In_Min: 6242  |
6242        →   |  In_Max: 31208 |
31208       →   |  Out_Min: 32.0 |
32.0        →   |  Out_Max: 250.0|
250.0       →   |________________|

Converts 4-20mA analog input (6242-31208 counts from ADC)
to engineering units (32-250°F) for temperature display and control.
PID Control Block:
PV (REAL)        →  |              |  → CV (REAL)
SP (REAL)        →  |              |     Control Value
Auto (BOOL)      →  |    PID       |
                    |  Controller  |  → Error (REAL)
Kp (REAL)        →  |              |
Ki (REAL)        →  |              |
Kd (REAL)        →  |______________|
Math Function Blocks:
ADD:  Input1 + Input2 = Output
SUB:  Input1 - Input2 = Output
MUL:  Input1 * Input2 = Output
DIV:  Input1 / Input2 = Output
SQRT: Square root function
ABS:  Absolute value
MIN:  Minimum of inputs
MAX:  Maximum of inputs
AVG:  Average of inputs
Complete FBD Example - Batch Temperature Control
[Batch Temperature Control System]

Setpoint_Input  →  |      |  →  Setpoint_Value
                   | MOV  |
                   |______|

Tank_Temp_AI  →  |                |  → Temperature_°F
               |  SCALE          |
0          →   |  In: 0-32767    |
32767      →   |  Out: 0-500°F   |
0.0        →   |                 |
500.0      →   |_________________|

Temperature_°F  →  |                |  → Heater_Output_%
Setpoint_Value  →  |      PID       |
Auto_Mode       →  |   Controller   |
Approved_Kp     →  |  Project gains |  → Control_Error
Approved_Ki     →  |  and limits    |
Approved_Kd     →  |________________|

Heater_Output_% →  |                |  → Heater_Demand_Counts
                   |  SCALE         |
0.0         →      |  In: 0-100%    |
100.0       →      |  Out: 0-32767  |
0           →      |                |
32767       →      |________________|

Heater_Demand_Counts → %AQ00001 (4-20mA Heater Control)

Illustrative jacket-heater control pattern only. Controller form,
sample time, scaling, gains, limits, alarm bands and acceptance
criteria must come from the approved process design and a controlled
tuning test. No temperature performance is claimed by this example.
Communication and Networking
GE PACSystems provides comprehensive communication capabilities supporting multiple industrial protocols enabling integration with diverse field devices, HMI systems, SCADA platforms, and enterprise networks.
Ethernet Global Data (EGD)
EGD Overview:
Ethernet Global Data (EGD) provides GE's proprietary high-speed data exchange mechanism enabling distributed PACSystems controllers to share I/O, setpoints, and status information without master/slave polling overhead.
EGD Key Features:
- Publisher/Subscriber Model: Controllers publish data automatically received by subscribers
- Configured exchange: Publish/consume behavior, data layout and update settings are project configuration
- Multicast design: Switching, routing and subscriber behavior must be verified in the installed network
- Engineering workflow: Use the installed PAC Machine Edition help for the exact target and software build
- Payload boundary: Confirm exchange limits in the current EGD documentation rather than copying a generic byte count
- Failure behavior: Define stale-data detection, peer restart and loss-of-network response
EGD Configuration Example:
Publisher Controller: RX3i Station 1 (192.168.1.100)
Exchange Name: PUMP_STATUS
Data: %R00100 through %R00150 (50 registers)
Period: 100ms
Multicast Address: 239.192.1.1

Subscriber Controller: RX3i Station 2 (192.168.1.101)
Exchange Name: PUMP_STATUS (consume)
Local Memory: %R00200 through %R00250
Source: 192.168.1.100 (Publisher)

Application: Pump station status shared with main water treatment
plant controller including pump run status, flow rates, pressures,
and valve positions updated 10 times per second.
Modbus TCP/RTU Communication
GE PACSystems supports both Modbus TCP (Ethernet) and Modbus RTU (serial) protocols enabling connection to thousands of compatible devices from hundreds of manufacturers.
Modbus Communication Setup:
- Add Modbus configuration to hardware tree
- Configure as Master or Slave
- Define register mappings between Modbus addresses and PACSystems references
- Set communication parameters (baud rate, parity, timeout)
Modbus Master Example - Reading Flow Meter:
Modbus TCP Master Configuration:
Device IP: 192.168.1.55 (Electromagnetic Flow Meter)
Function Code: 03 (Read Holding Registers)
Starting Address: 40001
Register Count: 4 registers
Mapping:
  40001-40002 → %R01000-01001 (Flow Rate - 32-bit Float)
  40003-40004 → %R01002-01003 (Totalizer - 32-bit Float)
Poll Rate: 500ms
For complete Modbus protocol implementation details including frame structure, function codes, and wiring, see our comprehensive Modbus RTU Protocol Tutorial.
PROFINET IO Integration
PACSystems RX3i controllers support PROFINET IO Controller functionality, enabling integration with PROFINET field devices including drives, I/O modules, and instrumentation.
PROFINET Configuration Steps:
- Add PROFINET IO Controller to hardware configuration
- Import GSDML device description files for PROFINET devices
- Configure IO Controller IP address and device name
- Add PROFINET devices to configuration
- Map device data to PACSystems memory references
- Set update rates and diagnostic parameters
PROFINET Application Example:
PACSystems RX3i (192.168.2.10) as PROFINET IO Controller
├── Siemens G120 VFD Drive (192.168.2.20)
│   ├── Control Word → %Q00100
│   ├── Speed Reference → %AQ00001
│   ├── Status Word → %I00100
│   └── Actual Speed → %AI00001
│
├── Phoenix Contact Axioline I/O (192.168.2.30)
│   ├── 16 DI → %I00200-00215
│   └── 16 DO → %Q00200-00215
│
└── Endress+Hauser Flow Meter (192.168.2.40)
    ├── Flow Rate → %AI00010
    └── Totalizer → %R01500-01501

Update Time: 10ms (PROFINET RT)
Learn more about PROFINET protocol, RT/IRT communication, and advanced configuration in our PROFINET Tutorial Complete Guide.
EtherNet/IP Communication
EtherNet/IP support enables PACSystems integration with Allen-Bradley and other CIP-based automation devices, facilitating multi-vendor system integration.
EtherNet/IP Configuration:
- PACSystems can operate as EtherNet/IP Adapter or Scanner
- Import EDS device files for EtherNet/IP devices
- Configure Class 1 (cyclic) and Class 3 (explicit messaging) connections
- Map I/O assembly data to PACSystems memory
OPC UA Server
Modern RX3i CPUs include integrated OPC UA server enabling secure data access for SCADA systems, MES platforms, historians, and Industry 4.0 applications.
OPC UA Features:
- Secure authenticated connections with encryption
- Industry-standard information modeling
- Platform-independent client connectivity
- Historian integration without additional hardware
- Cloud connectivity for remote monitoring
Practical Application: Water Treatment Plant
This fictional exercise demonstrates PACSystems project organisation and I/O mapping. It is not a complete or approved municipal treatment-plant design; the equipment, chemistry, setpoints and protective functions must come from the facility's engineering documents.
System Overview
Process Description:
- Raw water pumped from river intake to plant
- Coagulant chemicals added for flocculation
- Clarified water passes through multimedia filters
- Chlorine disinfection added
- Treated water pumped to distribution system
Control Requirements:
- Automatic pump sequencing with lead/lag rotation
- Flow-paced chemical dosing with override capability
- Filter backwash sequencing based on differential pressure
- Storage tank level control
- SCADA system integration via Modbus TCP
Hardware Configuration
Illustrative legacy RX3i hardware map:
CPU: IC695CPE310 (192.168.1.10)
Power Supply: IC695PSA040
Ethernet Module: IC695ETM001 (192.168.1.11)

Backplane Configuration:
Slot 0: IC695CPE310 CPU
Slot 1: IC695MDL740 - 32pt 24VDC Input
Slot 2: IC695MDL940 - 32pt 24VDC Output
Slot 3: IC695ALG600 - 8ch Analog Input (4-20mA)
Slot 4: IC695ALG608 - 8ch Analog Output (4-20mA)
Slot 5: IC695ETM001 - Ethernet Switch Module
Confirm every listed SKU, lifecycle state, power budget, backplane compatibility and replacement path with Emerson. The prior cost estimate has been removed because it was unsourced and excluded software, enclosure, networking, engineering and commissioning.
I/O Assignment:
DIGITAL INPUTS (%I):
%I00001 - Raw_Water_Low_Level
%I00002 - Raw_Water_High_Level
%I00003 - Filter_1_Run_Status
%I00004 - Filter_2_Run_Status
%I00005 - Filter_3_Run_Status
%I00006 - Clear_Well_Low_Level
%I00007 - Clear_Well_High_Level
%I00008 - HS_Pump_1_Run_Status
%I00009 - HS_Pump_2_Run_Status
%I00010 - Chem_Pump_Run_Status
%I00011 - Auto_Mode_Selector
%I00012 - Emergency_Stop

DIGITAL OUTPUTS (%Q):
%Q00001 - Raw_Water_Pump_1
%Q00002 - Raw_Water_Pump_2
%Q00003 - Chemical_Feed_Pump
%Q00004 - Filter_1_Influent_Valve
%Q00005 - Filter_2_Influent_Valve
%Q00006 - Filter_3_Influent_Valve
%Q00007 - HS_Pump_1_Starter
%Q00008 - HS_Pump_2_Starter
%Q00009 - Backwash_Valve
%Q00010 - Plant_Alarm_Horn

ANALOG INPUTS (%AI):
%AI00001 - Raw_Water_Flow (0-1000 GPM)
%AI00002 - Filter_1_DP (0-10 PSI)
%AI00003 - Filter_2_DP (0-10 PSI)
%AI00004 - Filter_3_DP (0-10 PSI)
%AI00005 - Clear_Well_Level (0-20 feet)
%AI00006 - Distribution_Pressure (0-100 PSI)
%AI00007 - Chlorine_Residual (0-5 PPM)
%AI00008 - Turbidity (0-10 NTU)

ANALOG OUTPUTS (%AQ):
%AQ00001 - Raw_Water_VFD_Speed (0-100%)
%AQ00002 - Chemical_Pump_Speed (0-100%)
%AQ00003 - HS_Pump_1_VFD_Speed (0-100%)
%AQ00004 - HS_Pump_2_VFD_Speed (0-100%)
Flow-Paced Chemical Dosing Program
Do not calculate a real chemical command from the tutorial constants that previously appeared here. Use a reviewed unit-conversion module and the validation wrapper below:
FUNCTION_BLOCK Chemical_Dosing
VAR_INPUT
    ReviewedDemand : REAL;
    AutoEnable : BOOL;
    FlowQualityGood : BOOL;
    RecipeApproved : BOOL;
    EquipmentReady : BOOL;
    HighLimitActive : BOOL;
    Config : ApprovedFeedConfig;
END_VAR

VAR_OUTPUT
    PumpStart : BOOL;
    PumpCommand : REAL;
    FaultLatched : BOOL;
END_VAR

CommandValid := (ReviewedDemand >= Config.CommandLow)
                AND (ReviewedDemand <= Config.CommandHigh);

PumpStart := AutoEnable
             AND FlowQualityGood
             AND RecipeApproved
             AND EquipmentReady
             AND NOT HighLimitActive
             AND CommandValid;

PumpCommand := SEL(PumpStart, Config.SafeOutput, ReviewedDemand);

IF NOT PumpStart THEN
    FaultLatched := HighLimitActive OR NOT CommandValid
                    OR NOT FlowQualityGood OR NOT EquipmentReady;
END_IF;

END_FUNCTION_BLOCK
Run Structured Text in the simulator
High-Service Pump Control with VFD
|═════════════════════════════════════════════════════════════════|
|  High-Service Pump Control - Distribution Pressure Management    |
|═════════════════════════════════════════════════════════════════|
|                                                                  |
|  Auto_Mode    ClearWell_Low     EmergencyStop    System_Enable  |
|----] [----------]/[-----------------]/[-----------( )-----------|
|                                                                  |
|  System_Enable  Pressure_Low    Pump1_Fault      Pump1_Enable  |
|----] [------------] [--------------]/[-------------( )----------|
|                                                                  |
|  Pump1_Enable    Pump1_Start_Delay                 Pump1_Run    |
|----] [-------------] [------------------------------( )---------|
|                                                                  |
|  System_Enable  Pressure_OK      Pump2_Fault      Pump2_Enable |
|----] [------------] [---------------]/[-------------( )---------|
|                                                                  |
|  Pump2_Enable    Pump2_Start_Delay                 Pump2_Run   |
|----] [-------------] [------------------------------( )---------|
|                                                                  |

(* Pressure Control with VFD *)
FUNCTION_BLOCK Pressure_Control
VAR_INPUT
    Distribution_Pressure_PSI : REAL;
    Pressure_Setpoint : REAL;
    Pump_Running : BOOL;
    PressureQualityGood : BOOL;
    Config : ApprovedPumpConfig;
END_VAR

VAR_OUTPUT
    VFD_Speed_Command : REAL;
END_VAR

VAR
    Error : REAL;
END_VAR

IF Pump_Running AND PressureQualityGood THEN
    Error := Pressure_Setpoint - Distribution_Pressure_PSI;
    VFD_Speed_Command := LIMIT(
        Config.MinimumApprovedSpeed,
        Config.BaseSpeed + (Config.ProportionalGain * Error),
        Config.MaximumApprovedSpeed
    );
ELSE
    VFD_Speed_Command := Config.SafeOutput;
END_IF;

END_FUNCTION_BLOCK
Run this in the simulator — no signup
Acceptance results to collect:
- Pressure response and steady-state error across approved demand cases
- Minimum-flow, low-suction, high-pressure and communications-loss behavior
- Pump command versus running feedback and timeout diagnostics
- Chemical-feed no-flow and high-limit tests
- CPU STOP/RUN and power-recovery state
No energy, accuracy or unattended-operation result is claimed without a measured site test.
For additional water treatment programming examples and SCADA integration, see our Water Treatment PLC Programming Guide.
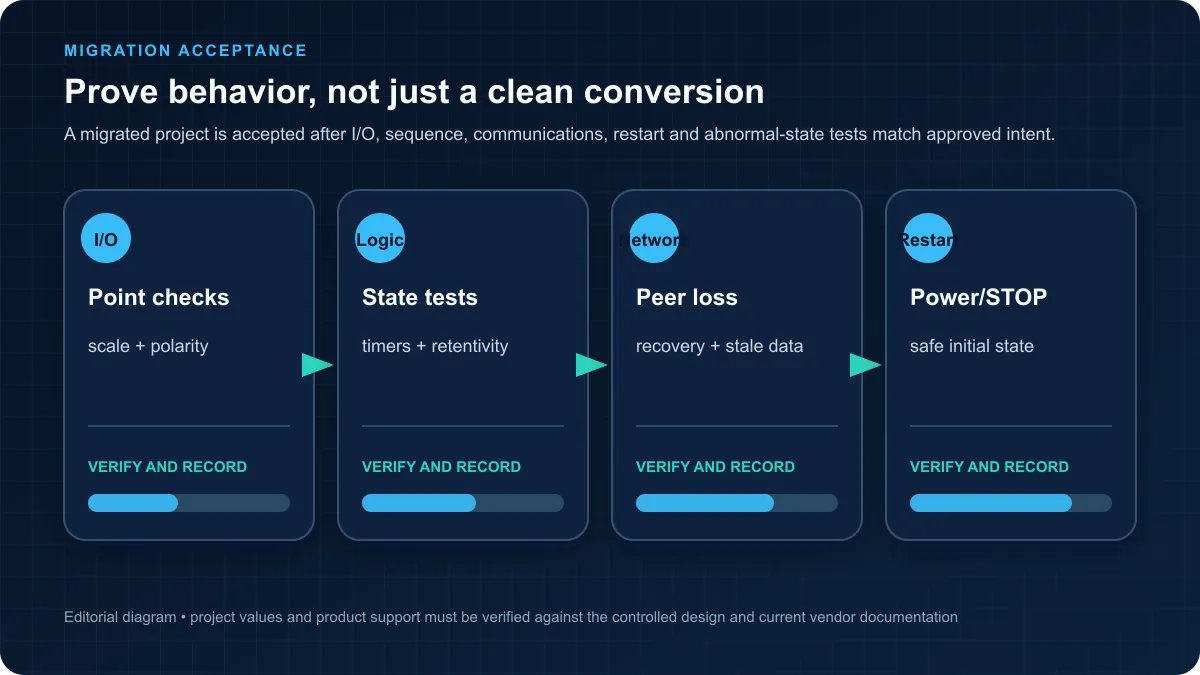
Legacy Redundancy and Migration Checks
RX7i redundancy remains relevant to installed systems, but it should not be specified from a generic web example. Confirm the exact controller pair, firmware, redundancy hardware, lifecycle status and supported migration path with Emerson before changing an existing system or selecting replacements.
Availability redundancy is not functional safety. A redundant controller architecture can reduce some availability risks, but it does not establish a SIL or PL claim.
Understanding CPU Redundancy
Redundant CPU Architecture:
An installed redundant system may use primary and backup roles, but the precise synchronization, fault-detection and transfer behavior depends on its hardware and firmware:
- Primary CPU: Actively controls I/O, executes program, and communicates with SCADA
- Backup CPU: Maintains the supported standby state defined by the system manual
- Synchronization: Verify which program and process states are transferred
- Switchover: Measure detection and transfer behavior under each approved fault case
- Process response: Do not call a transfer “bumpless” without trend evidence
Configuring Redundant RX7i System
Illustrative legacy layout—not a bill of materials:
Redundant CPU Configuration:
├── Slot 0: IC697CPX935 Primary CPU
├── Slot 1: IC697CPX935 Backup CPU
├── Redundancy Cable: Connects CPUs for synchronization
├── Redundant Ethernet: Dual network interfaces both CPUs
└── Redundant Power: Dual power supplies
Redundancy Configuration Steps:
-
Hardware Installation:
- Verify the exact catalog numbers and supported chassis arrangement
- Follow the hardware manual for synchronization and network connections
- Identify common-cause power, network and I/O failures
-
Software Configuration (Proficy Machine Edition):
- Open the original validated project in its compatible engineering version
- Configure Primary CPU IP addresses and parameters
- Configure Backup CPU IP addresses (different from Primary)
- Enable CPU redundancy in system configuration
- Record every switchover and synchronization setting
- Validate I/O behavior separately from CPU-role changes
-
Download and Synchronization:
- Download program to Primary CPU
- Follow the installed-system manual for download and synchronization
- Verify both controller states and every diagnostic
- Execute the fault matrix below before returning the process to service
Redundant System Operation
Normal Operation:
Primary CPU:        [ACTIVE]
├── Executing program logic
├── Controlling all I/O modules
├── Communicating with SCADA/HMI
├── Synchronizing to Backup CPU
└── Monitoring Backup CPU health

Backup CPU:         [STANDBY]
├── Receiving program synchronization
├── Monitoring I/O states
├── Ready to assume control
├── Monitoring Primary CPU health
└── Waiting for switchover trigger
Switchover Scenarios:
- Primary CPU Failure: Hardware fault, watchdog timeout, power loss
- Communication Loss: Network failure, cable disconnection
- Operator Commanded: Manual switchover for maintenance
- Program Error: Runtime fault or exception in Primary CPU
Switchover test matrix:
| Test | Fault introduced | Required evidence |
|---|---|---|
| 1 | Commanded switchover | Role change, state consistency and measured interruption |
| 2 | Primary controller power loss | Detection, transfer, outputs and alarm timestamps |
| 3 | Synchronization-link loss | Defined degraded state and operator alarm |
| 4 | One control-network path lost | Surviving path and communication diagnostics |
| 5 | Standby unavailable | No false redundancy-ready indication |
| 6 | Restore failed controller | Controlled resynchronization without state corruption |
| 7 | Approved full power-recovery sequence | Documented recovery and retained-data behavior |
| 8 | Shared I/O or network fault | Proof that CPU redundancy does not hide the common cause |
Record hardware revisions, firmware, PAC Machine Edition version, network design and trend resolution with the results.
Illustrative redundancy monitor
This status block is a test aid, not a redundancy controller or safety function. Bind its inputs only to documented diagnostics for the exact target.
Redundant System Configuration:
(* Redundancy Status Monitoring *)
FUNCTION_BLOCK Redundancy_Monitor
VAR_INPUT
    Primary_CPU_OK : BOOL;
    Backup_CPU_OK : BOOL;
    Sync_Status : BOOL;
    Switchover_Count : INT;
END_VAR

VAR_OUTPUT
    System_Healthy : BOOL;
    Redundancy_Lost_Alarm : BOOL;
    Excessive_Switchovers_Alarm : BOOL;
END_VAR

(* Monitor redundancy health *)
IF Primary_CPU_OK AND Backup_CPU_OK AND Sync_Status THEN
    System_Healthy := TRUE;
    Redundancy_Lost_Alarm := FALSE;
ELSE
    System_Healthy := FALSE;

    (* Alarm if redundancy compromised *)
    IF NOT (Primary_CPU_OK AND Backup_CPU_OK) THEN
        Redundancy_Lost_Alarm := TRUE;
    END_IF;
END_IF;

(* Detect excessive switchovers indicating intermittent fault *)
IF Switchover_Count > 5 THEN
    Excessive_Switchovers_Alarm := TRUE;
END_IF;

END_FUNCTION_BLOCK
Run Structured Text in the simulator
Decide from requirements, not industry labels
Build an availability model from the site’s permissible interruption, recovery objective, maintainability needs and common-cause risks. Use measured fault-injection results to support the design. A list of industries cannot prove that redundancy is necessary—or sufficient—for a particular process.
Best Practices for GE PACSystems
Professional GE PLC programming requires disciplined approaches ensuring reliability, maintainability, and long-term system performance across mission-critical power and process applications.
Program Organization Standards
Modular Program Structure:
Program Organization:
├── _MAIN (Main Program)
│   ├── System initialization
│   ├── Input conditioning
│   ├── Call control function blocks
│   └── Output assignments
│
├── PRG_Pump_Control (Pump Control Program)
│   ├── Lead/lag sequencing
│   ├── VFD speed control
│   └── Protection interlocks
│
├── PRG_Chemical_Dosing (Chemical Control Program)
│   ├── Flow pacing calculations
│   ├── Dose rate control
│   └── Chemical inventory tracking
│
├── FB_PID_Control (PID Function Block)
│   └── Reusable PID algorithm
│
└── FUN_Scale_Analog (Scaling Function)
    └── Analog input/output scaling
Benefits of Modular Organization:
- Individual programs tested independently
- Easier troubleshooting and debugging
- Code reuse across multiple applications
- Team development with defined interfaces
- Simplified documentation and maintenance
Naming Conventions
Variable Naming Standards:
Physical I/O:
Raw_Water_Pump_1_Run          (Output to pump starter)
Tank_High_Level_Switch        (Input from level switch)
Filter_Diff_Pressure_AI       (Analog input)
Chemical_Pump_Speed_AO        (Analog output)

Internal Memory:
System_Auto_Mode              (Boolean mode flags)
Pump_Lead_Select              (Selection variables)
Flow_Rate_GPM_Calc            (Calculated values)
Daily_Production_Totalizer    (Accumulators)

Function Blocks:
FB_Temperature_PID_01         (PID controller instance)
FB_Chemical_Dose_Calc         (Chemical dosing block)
FB_Filter_Backwash_Seq        (Sequence controller)

Constants:
HIGH_PRESSURE_LIMIT := 85.0   (Process limits)
LOW_FLOW_ALARM := 50.0        (Alarm setpoints)
PUMP_START_DELAY := T#5s      (Time constants)
Naming Convention Rules:
- Use descriptive names indicating function and location
- Avoid abbreviations unless industry-standard
- Use consistent capitalization (typically Upper_Case_With_Underscores)
- Include unit of measure for analog values
- Prefix function blocks with FB_, functions with FUN_
- Document all variables in declaration comments
Function Block Libraries
Creating Reusable Function Blocks:
Develop comprehensive function block libraries containing proven, tested control algorithms used across multiple projects:
Standard Library Contents:
├── FB_Pump_Control           (Standard pump logic)
├── FB_PID_Control            (PID with all features)
├── FB_Lead_Lag_Select        (Lead/lag sequencer)
├── FB_Totalizer              (Flow totalization)
├── FB_Analog_Filter          (Signal filtering)
├── FB_Alarm_Manager          (Alarm handling)
└── FB_Runtime_Equalizer      (Equipment rotation)
Library Development Benefits:
- Reuse of reviewed structures, naming and diagnostics; measure any engineering-time change against your own project baseline
- Consistent control algorithms across plants
- A defined place to retain unit, integration and regression-test evidence
- Earlier detection of integration defects when the library is tested against representative hardware and failure cases
- Easier training for operators and maintenance staff
Documentation Requirements
Comprehensive Documentation Elements:
- Ladder Rung Comments: Explain logic purpose and operation
- Variable Descriptions: Detailed comments for all variables
- Function Block Headers: Purpose, inputs, outputs, algorithms
- Network Diagrams: Ethernet topology and IP addressing
- I/O Wiring Diagrams: Cross-reference to terminal blocks
- Sequence Descriptions: Written descriptions of operational sequences
- Alarm Documentation: Alarm causes and corrective actions
Documentation Example:
|═════════════════════════════════════════════════════════════════|
| PUMP LEAD/LAG ALTERNATION LOGIC                                  |
| Purpose: Alternates lead pump each start cycle to equalize      |
|          runtime and wear between Pump 1 and Pump 2             |
| Operation: Lead pump selected based on Lead_Select flag which   |
|           toggles each time both pumps stop after a run cycle   |
|═════════════════════════════════════════════════════════════════|
Run this in the simulator — no signup
Backup and Version Control
Project Backup Strategy:
Backup Locations:
├── Plant Control Panel (SD card in CPU)
├── Plant Office Computer (Local backup)
├── Corporate Engineering Server (Networked backup)
└── Cloud Storage (Off-site disaster recovery)

Backup Schedule:
- Before any program changes
- After commissioning completion
- Monthly for operating systems
- After any field modifications
Version Control Information:
Track program versions with detailed change documentation:
Project: Smithville Water Treatment Plant
Program Version: 3.2.5
Date: 2025-12-11
Author: Engineering Team
Changes: Added third filter backwash sequence
         Modified chemical dosing calculation for winter operations
         Updated high-service pump rotation logic
Previous Version: 3.2.4 (2025-11-15)
Migration from Legacy GE Systems
GE Series 90 to PACSystems Migration:
Organizations operating legacy GE Series 90-30 or Series 90-70 systems benefit from migrating to modern PACSystems:
Migration Steps:
- Inventory Existing System: Document current I/O, communication, programs
- Select Equivalent PACSystems Hardware: Match or exceed capabilities
- Convert Program Logic: Use Proficy Machine Edition import tools
- Validate and Test: Comprehensive factory acceptance testing
- Parallel Operation: Run old and new systems simultaneously initially
- Cutover and Commissioning: Plan cutover during scheduled outage
Migration Tools:
- Logicmaster 90 to Proficy Machine Edition conversion utility
- I/O configuration import from Series 90 projects
- Reference address mapping for Series 90 compatibility
- Ethernet Global Data replacement for Genius I/O
Migration Benefits:
- A supportable lifecycle tied to documented product status
- Measured performance and memory headroom for the converted application
- Required communication protocols verified on the exact target
- A quoted spares and support plan
- Cybersecurity functions mapped to the asset owner's requirements and maintenance process
Troubleshooting Common Issues
Connection Issues
Cannot Connect to CPU:
Common Causes:
- Incorrect IP address configuration
- Network cable issues or switch problems
- CPU in wrong mode (needs to be RUN or STOP mode)
- Firewall blocking communication
- Proficy Machine Edition communication settings incorrect
Resolution Steps:
- Verify Ethernet cable connected and link lights active
- Ping CPU IP address from programming computer
- Check CPU mode switch position
- Verify firewall allows ports 18245, 18246 (GE PACSystems)
- Use "Set PLC Mode" in Proficy to configure communication path
- Try connecting via serial port if Ethernet fails
Configuration Errors
Hardware Configuration Mismatch:
Error: "Module in slot X does not match configured module"
Cause: Physical module different from configured module or module firmware mismatch
Resolution:
- Verify correct module installed in specified slot
- Check module catalog number matches configuration
- Update module firmware if version mismatch
- Rebuild hardware configuration if modules changed
Communication Diagnostics
Ethernet Global Data Not Updating:
Diagnostic Steps:
- Check EGD configuration producer and consumer addresses match
- Verify multicast routing if crossing subnets
- Monitor EGD diagnostics in system status tables
- Use Wireshark to capture and verify EGD packets
- Check firewall allows UDP multicast traffic
Modbus Communication Failures:
Diagnostic Steps:
- Verify Modbus master configuration (IP, port, slave ID)
- Check cable continuity for Modbus RTU
- Confirm slave device addresses configured correctly
- Monitor Modbus status variables (%S registers)
- Use Modbus test tools to verify slave device operation
- Check timeout settings allow adequate response time
Firmware Updates
Updating RX3i CPU Firmware:
- Backup current program before firmware update
- Download firmware package from Emerson support website
- Extract firmware files to local directory
- Use "Update Firmware" tool in Proficy Machine Edition
- Select firmware file and target CPU
- Follow the version-specific prompts and allow the full maintenance window; duration depends on CPU, package, transfer path and any required intermediate steps
- Verify CPU boots successfully with new firmware
- Test all critical functions before returning to operation
Firmware Update Best Practices:
- Perform updates during scheduled maintenance windows
- Have rollback plan with previous firmware version
- Test firmware update on spare CPU first if available
- Verify compatibility with current Proficy Machine Edition version
- Update I/O module firmware if required for compatibility
Frequently Asked Questions
What programming software does GE use?
Current Emerson PACSystems controllers use PAC Machine Edition. Older projects and documents commonly call the same engineering family Proficy Machine Edition. Confirm the supported software release, target family, firmware and licensed features in Emerson's compatibility documentation before opening or converting a production project.
Is GE PACSystems a PLC or PAC?
PACSystems is Emerson's product name for its programmable automation controller family. “PAC” and “PLC” are often used loosely in practice; choose from the exact controller's certified functions, performance, I/O and protocol support rather than the label.
What is Proficy Machine Edition?
Proficy Machine Edition is the legacy name readers will see in many installed-system projects and manuals; the current product is PAC Machine Edition. Supported editors, emulation, protocols, Windows releases and licenses vary by PAC Machine Edition release and controller target, so use the installed help and current Emerson release notes as the authority.
Can GE PLCs communicate with other brands?
Often, but interoperability is an engineering test—not a brand-level promise. Confirm the protocol role, option module, firmware, object or register mapping, data types, byte order, update behavior and fault handling at both endpoints. Use a bench test with the exact device revisions before field deployment.
What is Ethernet Global Data (EGD)?
Ethernet Global Data (EGD) is a producer/consumer exchange used in parts of the PACSystems ecosystem. Exact payload, timing, multicast, diagnostics and controller support depend on the target and release. Validate sequence handling, stale-data detection, network loss, controller restart and duplicate or delayed traffic; do not infer deterministic process performance from a configured update value alone.
What industries use GE PACSystems?
PACSystems products appear in machine, process and infrastructure installations. This guide does not assert market share or suitability by industry. Evaluate the exact model against the application requirements, certifications, lifecycle status, local support and reproducible acceptance tests.
How do I program a GE RX3i?
Programming a GE RX3i controller follows this general workflow:
1. Install a supported PAC Machine Edition release:
- Download from Emerson website or obtain from distributor
- Install with administrative privileges on Windows 10/11 computer
- Verify the controller, firmware and operating-system compatibility
- Record the installed version and license in the project baseline
2. Create New Project:
- Launch Proficy Machine Edition
- Select File → New → Project
- Choose "RX3i" as controller family
- Select specific CPU model (e.g., IC695CPE310)
- Name project and set storage location
3. Configure Hardware:
- Add CPU to configuration and set Ethernet IP addresses
- Add I/O modules from catalog to backplane slots
- Assign reference addresses to I/O modules (%I, %Q, %AI, %AQ)
- Configure communication modules if required (Modbus, PROFINET, EtherNet/IP)
- Set CPU scan rate and parameters
4. Write Program:
- Create Program Organization Units (POUs)
- Declare variables (inputs, outputs, internal memory)
- Write logic using Ladder Diagram, Structured Text, or Function Block Diagram
- Add rung comments and documentation
- Create reusable function blocks if needed
5. Compile and Debug:
- Compile project (Build menu) and resolve any errors
- Use supported simulation or a test controller for logic tests
- Never force live field outputs without an approved commissioning procedure
- Debug and refine program
6. Download to Controller:
- Connect programming computer to RX3i via Ethernet
- Set CPU to Program mode (keyswitch or software command)
- Download project to CPU
- Switch CPU to Run mode
- Monitor program execution online
- Verify all I/O and logic operating correctly
7. Commission and Document:
- Test all control sequences with field devices
- Perform functional acceptance testing
- Create backup of final program
- Document system configuration and operation
For detailed step-by-step instructions with examples, refer to earlier sections of this tutorial covering hardware configuration, ladder logic programming, structured text, and practical applications.
How do RX3i and RX7i relate to the current portfolio?
RX3i and RX7i are legacy names encountered in installed systems. Emerson's current naming maps RX3i to the PACSystems 300-Series, while an RX7i migration must be evaluated from the exact installed catalog numbers and lifecycle documents. Do not use generic memory, timing, price or “bumpless” figures from a comparison page. Inventory the CPU, racks, I/O, communications, firmware, project software and redundancy behavior, then obtain a supported migration path from Emerson.
Is GE still making PLCs? (Now Emerson)
Emerson announced the acquisition of GE Intelligent Platforms in 2018 and identifies the business as acquired in 2019. PACSystems is now an Emerson portfolio. Current availability is product-specific: check Emerson's lifecycle and migration information for every catalog number rather than assuming all legacy RX3i, RX7i or VersaMax parts remain unchanged.
Can I use GE PLCs for safety applications?
Only an exact safety-certified controller, I/O set, firmware, engineering tool and architecture may implement a claimed safety function. A standard PACSystems CPU—or an availability-redundant pair—is not made safety-rated by ladder logic. Emerson's current portfolio identifies a CPS400 Safety PLC within the 400-Series; use its current certificate and safety manual, plus the machine or process risk assessment, to determine whether it fits. Keep ordinary control examples in this article outside the safety function.
Conclusion
PACSystems projects are safest to learn in a small loop: select the exact current or legacy target, verify its manual and lifecycle status, build one deterministic routine, run the acceptance matrix, then save the software and firmware baseline with the results. The examples here are learning fixtures; production I/O, networking, control limits, redundancy and safety functions require application-specific engineering and commissioning evidence.
Practice the sequence in a simulator before touching hardware, then repeat it on an isolated test controller with the exact target configuration.
Now run it · free · no signup
Run your first PLC program in your browser
Build one rung, press Run and watch the output change in a free browser lab. Nothing to install and no signup needed to try it.
Ownership disclosure: PLC Programming IO and PLC Simulation Software are operated by the same publisher.


